Do you want to add a splash of vibrant color to your garden this year? Planting tulip bulbs is a great way to do just that.
But before you dive into it, it’s important to understand the basics of how and when to plant them. With the right information and the right preparation, you can create a stunning display of tulips in your backyard.
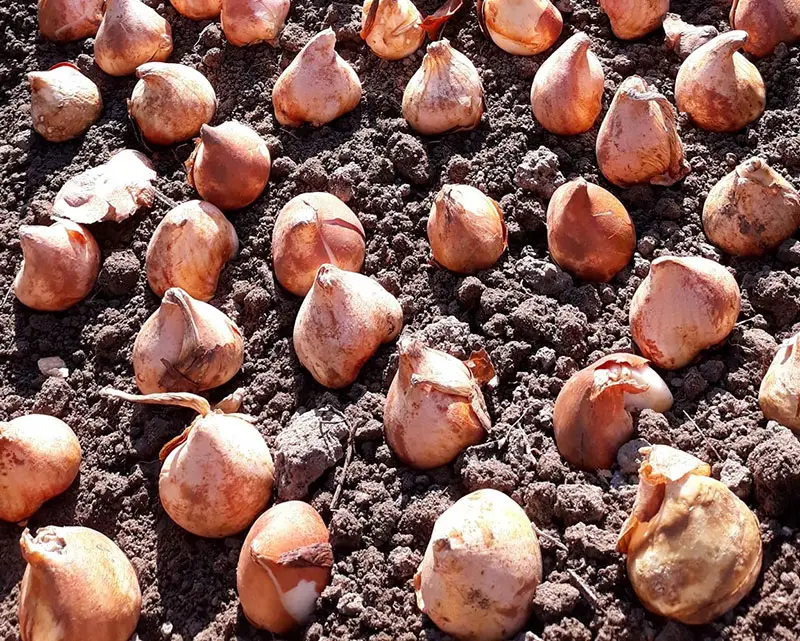
Choosing the Right Bulbs
Selecting the perfect bulbs for your garden can be an exciting prospect, evoking anticipation and joy. When selecting tulip bulbs, look for those that are firm to the touch and feel heavy for their size. You should also check that they aren’t too soft or discolored.
If you’re planting a large number of bulbs, make sure to mix up the varieties so that you have a stunning array of colors in bloom. If you’re uncertain about which type of tulip to buy, consider consulting with an experienced gardener or consult online resources for helpful tips on choosing the right bulb for your desired location.
Preparing the Planting Location
Prepare the perfect spot for these beautiful blooms to make their debut. When looking for a location to plant your tulip bulbs, choose an area that receives full sun or partial shade.
Tulips need well-drained soil with a neutral pH level, so before planting it’s important to test the soil and adjust if necessary with organic material like compost. If you’re planting in a pot or window box, be sure to use high quality potting mix.
The depth of the hole should be two times the height of the bulb and spaced 3-4 inches apart from each other – this will give them enough room to grow without crowding. To ensure optimal flowering, add a balanced fertilizer when planting and again once they start actively growing in spring.
When to Plant Tulip Bulb?
Deciding when to get your bulbs in the ground is an important part of the planting process. Fall is generally the best time to put them in, but you need to make sure it’s after the first frost so they can settle into their new home. Planting your tulip bulbs too early may cause them to rot before springtime arrives, and if you wait too late, they might not have enough time to establish themselves well before winter comes around again.
Keep an eye on the weather forecast and plant just as soon as temperatures start dropping and there’s a risk of frost.
Do Tulip Bulbs Need Roots?
You’ll want to make sure you’ve got everything in order before getting your little beauties underground. Tulip bulbs don’t need roots for growing, but they can be helpful.
Rooted bulbs are generally more vigorous than those that have been forced to sprout without the help of a root system, so it’s worth considering this option if you have access to them.
When tulips sprout naturally in the spring from dormant bulbs, these accompanying roots help to anchor them securely into the soil and absorb additional nutrients as needed during their growth cycle.
In terms of bulb planting, this means that while rooted or unrooted bulbs will both grow successfully, rooted ones may be better equipped to handle any difficulties that might arise during the course of their growth season.
Do Tulips Multiply?
Are you curious about how to increase your tulip population? Multiplying tulips is a great way to achieve that goal. Tulips are one of the few flowers that will naturally reproduce after they’ve been planted. The bulbs are able to split and form new bulbs, which can then be separated from the parent bulb and replanted in different areas.
When the conditions are right, such as adequate sunlight and water, these new bulbs can grow into full-sized plants with beautiful blooms. While this process isn’t immediate, it does allow for a slow expansion of your garden over time.
When trying to multiply your tulips, it’s important to pay attention to their growth habits. Since they need enough space between them so that they don’t overcrowd each other or deplete nutrients from the soil too quickly, you may want to consider planting in patches instead of rows if you’re looking for a large number of plants. Additionally, make sure they’re placed in an area where they’ll get plenty of sunlight and be watered regularly so that the bulbs have what they need to divide successfully.
How To Plant Tulip Bulbs In The Ground
Now that you know that tulips don’t multiply by themselves, it’s time to learn how to plant them in the ground. Planting tulip bulbs correctly in the ground can be a great way to ensure the most blooms for your garden. Here are three steps you can take to make sure your tulip bulbs come up beautiful and healthy:
- Choose an area with plenty of full sun and well-draining soil. Tulips need at least six hours of direct sunlight each day for best results, and well-draining soil helps prevent root rot.
- Dig holes around 3 inches deep and 6 inches apart from other bulbs so they have room to spread out once planted. Place one bulb in each hole pointed side up, then cover with dirt until just covered over completely.
- Water thoroughly after planting and keep evenly moist throughout the growing season (April through October). This will help get your tulips off to the best start possible.
Planting tulip bulbs correctly in the ground is an easy process that almost anyone can do, but it’s important to follow these steps carefully; otherwise, you might not get as many blooms or as much success as you’d like. With these tips, you’re sure to enjoy beautiful blooms this spring.
Planting in Pots
Planting tulips in pots requires a bit of extra effort, but the rewards are worth it – with just a few simple steps, you’ll reap a bountiful harvest.
Start by selecting a container that’s large enough to accommodate several bulbs. The pot should have drainage holes to allow excess water to escape. Fill the container with well-draining soil and mix in some slow-release fertilizer before planting your bulbs. Place them at least three inches deep and two inches apart.
Water thoroughly after planting and place in an area that receives at least six hours of sunlight each day. With proper care, you’ll be able to enjoy vibrant blooms all season long.
Now that your tulip bulbs are securely planted, it’s time to prepare for deadheading. Deadheading is an important part of maintaining your plants and ensuring they look their best throughout the growing season.
To start, remove any wilted or browned leaves as soon as possible so they don’t detract from the overall appearance of your garden display. Once the flowers begin to die off, snip them off at the base of the stem so new buds can take their place and keep your garden looking healthy and beautiful.
Deadheading Tulips
Deadheading your blooms is an essential part of keeping your garden looking vibrant and lush. You’ll want to trim off wilted or discolored leaves, as well as snip off dead flowers at the stem’s base, to help ensure a beautiful display all season long.
The most important tip to remember when deadheading tulips is to wait until the petals have fallen off completely before you cut the stem. This will maximize nutrient storage in the bulb, allowing it to store energy for next year’s bloom.
After the petals have dropped, simply use scissors or pruners to cut off the spent flower head at its base so that only about an inch of stem remains attached to the plant. Doing this prevents seed production and encourages more vigorous growth in subsequent seasons.
How To Plant Tulip Bulbs After They Bloom
Once the blooms have faded away, it’s time to get your hands dirty and give those bulbs a new home in your garden. Planting tulip bulbs after they bloom is easy, but there are some things you should keep in mind:
- Choose a sunny spot in your yard with good drainage.
- Dig a hole that is 6-8 inches deep and place the bulb with its pointy side up.
- Cover the bulb with soil, making sure to leave 2-3 inches of soil above the bulb.
Then water thoroughly and wait for the magic to happen. This process will ensure that you get beautiful tulips each year in your garden.
To get even more out of them, consider planting them in water instead for an exciting twist on this classic flower.
How To Plant Tulip Bulbs In Water
Invigorate your garden with a unique twist on the classic tulip – planting them in water.
All you need is a container of your choice, some potting soil, and of course, the bulbs themselves. Make sure to select tulips that are healthy and free from disease or pests.
Fill the container halfway with potting soil, nestle in the bulbs so that they’re not touching each other, then fill up the rest of the way with more soil.
Place the container in a sunny spot and keep it consistently moist. You’ll soon be rewarded with vibrant blooms.
Storing Tulip Bulbs
Storing tulip bulbs is a must to ensure your garden’s vibrant beauty for years to come. It’s so simple, you’ll feel like a horticultural genius.
Tulip bulbs should be stored in a cool, dry place with temperatures between 35-50 degrees Fahrenheit and humidity levels below 65%. You can store your bulbs in cardboard boxes or mesh bags. If you’re using boxes, make sure that they have holes punched in them to allow air circulation.
Also, make sure the box is labeled with the name of the flower variety as well as when it needs to be replanted. To further protect your bulbs from moisture, add some vermiculite or peat moss inside the box.
With these tips in mind, you can enjoy the beautiful blooms of tulips year after year without having to purchase new bulbs each season.
How To Plant Tulip Bulbs In Spring
Planting tulip bulbs in the spring is a great way to bring vibrant color and life to your garden – and it’s simpler than you think. Here are some simple steps for success:
- Choose an area that gets at least six hours of sun per day.
- Dig holes two to three times the height of your bulb.
- Place the bulb pointed end up into the hole, cover it with soil, and water well.
By following these easy steps, you’ll be sure to have beautiful tulips come blooming season. Planting tulips in the fall is also a great option for those looking to add more color to their gardens.
How To Plant Tulip Bulbs In The Fall
If you’re looking to add a splash of color to your garden this autumn, planting tulip bulbs is an easy and enjoyable way to do so.
Fall is the perfect time to get your garden ready for spring blooms, and planting these vibrant flowers in the fall will give you beautiful tulips come springtime.
To get started, choose your favorite variety of tulips and purchase healthy bulbs at your local garden store or online.
Plant each bulb 3-4 inches deep with their pointed end facing up. Tulips typically prefer well-drained soil that’s been amended with organic matter such as composted manure or peat moss.
Water generously after planting, then keep the area weed-free throughout the winter months.
Come spring, you’ll be rewarded with colorful blooms that will last through early summer.
Final Thoughts
Congratulations. You’ve made it through all the steps on planting tulip bulbs. If done correctly, you’ll have a beautiful garden full of vibrant colors.
Planting tulips is a symbolic way to add life and beauty to your outdoor space. It’s like giving your garden a breath of fresh air each year as you watch them bloom with new colors and life.
By taking the time to properly prepare and plant your tulip bulbs, you can enjoy their stunning blooms for years to come.