The indigo plant can be grown from seed fairly easily. It will grow best when kept warm. It is a lovely plant to have in your home in a sunny location but will not thrive very well outside.
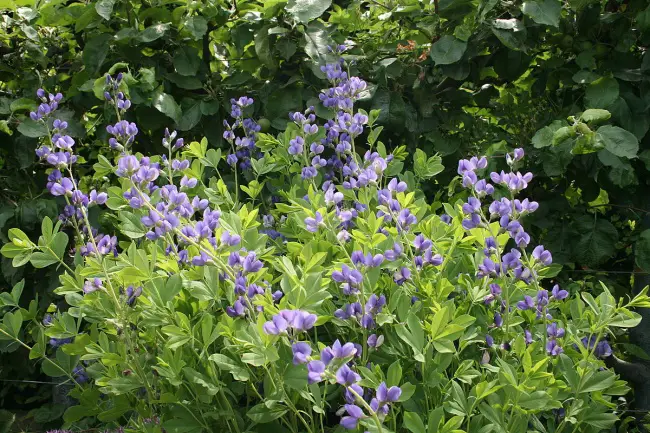 Photo credited: Wikimedia
Even in the warmest seasons, it is best to keep Indigo inside your home. The plant tends to grow very rapidly in favorable conditions, such as in a greenhouse.
You will have to make sure that you keep it well-trimmed for the plant to have the best possibility of thriving. Many people use the leaves and stem from the indigo plant to make a dye that You can use for various purposes.
Plant Characteristics
Indigo (Indigofera tinctoria) is an evergreen shrub, native to the tropics and subtropics. It grows up to 3 meters in height, with compound leaves composed of three leaflets. The flowers are small and white with yellow centers, bearing fruit containing 1-4 seeds each. In its natural environment, indigo can be found along roadsides or forest edges.
The first use of indigo plants took place in India and dates back to the fourth century BC. The dye that could be extracted from the leaves and stems of the plant was used for a variety of purposes, and this made indigo a precious plant.
Over time the useful indigo plant became recognized as the ideal plant to obtain dye, and it was widely cultivated during the sixteenth and seventeenth centuries in northern India.
The plant has several medicinal uses as it contains antifungal and antibacterial properties. It is also used for dyeing fabrics due to its unique blue pigment which develops when exposed to oxygen in air or water. This property makes it a valuable crop in many parts of the world.
Given its versatility, indigo requires specialized care if growers wish to make the best use of this lovely bush’s potential. To maximize yields both aesthetically and economically, one must understand how optimal growing conditions affect this special species.
Modern Uses Of The Indigo Plant
Today, indigo is still valued for its dye and is used in various crafts and art projects. You will see indigo used to dye fabric, and it is widely used as an ink painting. This plant is still revered for its lovely blue dye.
Ideal Growing Conditions
Indigo plants, scientifically known as Indigofera tinctoria, are a beautiful and unique species of flowering shrub. Due to their hardiness and adaptability, they can be grown in many places around the world. To ensure optimal growth and health for an indigo plant, ideal growing conditions must be provided.
Temperatures should remain consistent for best results; ideally between 65-75 degrees Fahrenheit during the day with nights no colder than 40 degrees Fahrenheit. The plant prefers sunlight but will tolerate partial shade or filtered light so long as at least five hours of direct sunlight is received each day. Adequate airflow is important too – avoid overcrowding or windy areas when planting multiple indigo bushes together.
Soil Requirements
Indigo plants require well-drained, slightly acidic soil in order to thrive. This can be achieved by adding humus or compost to create an ideal environment for the plant’s root system. To ensure that drainage is adequate, it is recommended to mix expanded clay pellets into the potting medium. The pH of the soil should also fall between 5 and 6; if necessary, use a soil test kit to determine its acidity level and adjust accordingly with fertilizer.
When planting an indigo plant outdoors, consider amending the native soil as this will provide essential nutrients and improve water retention. If you are growing your indigo in containers, then choose a high-quality potting mix specifically designed for succulents or cacti. Additionally, make sure that any container used is large enough so there is plenty of room for growth; pots should have at least one drainage hole on their base too.
Watering Frequency
Indigo plants require regular watering to stay healthy and vibrant. It is important not to overwater them, as this can lead to root rot, fungal diseases, and pest infestations. Here are some tips on how often you should water your indigo plant:
- Water when the top 2-3 inches of soil feels dry.
- Check for signs of wilting or drooping leaves that may indicate a need for more frequent watering.
- Use lukewarm water to avoid shocking the roots with cold temperatures.
- Do not allow the potting mix to become overly saturated with water, which will cause oxygen levels in the soil to drop off quickly and create an environment conducive to mold growth.
When it comes to determining how much water your indigo plant needs, consider factors such as temperature, light exposure, size of the container, and wind velocity at its location. In warm weather, plants typically require more frequent watering than those kept in cooler conditions. As well, larger pots take longer for moisture to evaporate from compared to smaller containers; therefore they should be watered less frequently but with larger amounts of water when needed instead of several small applications over time.
Windy locations also increase drying speed so these areas could use additional attention during hot days when the transpiration rate increases significantly due to high air movement rates around the foliage surface area.
To ensure optimal health for your indigo plant, pay close attention to its specific care requirements throughout different seasonal changes and monitor any unusual behavior that might signal a need for a change in watering frequency or amount given per application period.
Sunlight Needs
The sun is an essential ingredient for a healthy indigo plant. Like a warm hug, the sunlight brings with it nourishment and energy that allows the plant to thrive. But too much of this embrace can be detrimental and cause damage to delicate leaves or even death in extreme cases.
Varying between full sun, partial shade, and dappled light throughout the day will ensure the best results when growing indigo plants. It’s important to note that as temperatures increase during hot summer months, more protection from direct sunlight should be provided by relocating them to shaded areas such as patios or under trees. In addition, if your area experiences strong winds, consider providing further shelter for your indoor plants so they don’t suffer windburn on their leaves.
When grown outdoors, make sure to avoid planting your indigo near walls where heat may accumulate through reflection; instead, look for spots where there’s some airflow around its location. With these considerations taken into account, you’ll find maintaining the right amount of sunshine needed for optimal growth of your indigo plant achievable and manageable.
Fertilization Schedule
Indigo plants require fertilization during their growing season to help them reach maximum health and vibrancy. Fertilizer should be applied every four weeks, in the form of a water-soluble solution that is diluted according to the manufacturer’s directions. It is important to use only balanced fertilizer with no more than 10% nitrogen content so as not to burn or damage the roots of the plant.
When applying fertilizer, it is essential to avoid getting any on leaves or stems; instead, it should be directed toward the soil at least one inch from the stem base. Additionally, after application, it is necessary to water deeply so that nutrients can penetrate deep into the root zone and ensure even distribution throughout the potting mix.
If rainwater accumulates near indigo plants due to poor drainage or over-watering they may become stressed and suffer nutrient deficiencies which must be corrected through regular fertilization.
Growing Indigo From Seeds
To begin growing your indigo from seeds, begin in the latter part of May and sow the seeds in a large tray or saucer. You should cover the seeds only lightly with compost. Place a glass cover over the tray and keep it at about seventy-five degrees Fahrenheit.
When the seeds have germinated, please place them in pots and move them into progressively larger pots as they grow. The plant should be in compost that is loam-based and kept in the full sun. Indigo will also require good drainage in the pots. Keep the plants trimmed to get the best results from your plants.
Make sure that you continue to move the plants to ever-increasing pot sizes. The plant likes a lot of room and a pot with a great amount of drainage. Keep those pots in full sunlight to keep the plant warm.
The plant must keep warm for the best possible results. A windowsill is an ideal place to keep the plant as long as the window receives full sun.
Caring For Your Older indigo Plants
Indigo will do well during its growing season but may not experience much growth from October until March. As the plants continue to grow in size, continue to repot the plants.
They will thrive in a larger pot, but you should find that you reach the end with an eighteen-inch pot. When the plant becomes older and more mature, it will begin to produce flowers. The flowers are lovely reddish-pink and will look lovely in your home.
If you want your plant to flower more, you should feed it a high-in potassium fertilizer. And be sure that you keep your older plants pruned during the spring and summer months.
This will produce more flowers in your plant. Those growing the plant for dye should prune their plants from the beginning of the summer till September.
It is important to keep your plant indoors and warm for the best possible results. If it is grown in a greenhouse environment, great results will be, and the lovely plant will thrive.
With this plant, you can create your own dyes in your craft projects or dye fabrics. It is the original dye used in blue jeans, and synthetic indigo is still used today to dye the distinctive blue fabric.
Pruning Techniques
Pruning is an important part of caring for the indigo plant. Pruning helps maintain the shape and size of the plant as well as encourages healthy new growth. It also removes dead, diseased, or damaged branches that can spread disease to other parts of the plant.
When pruning an indigo plant, it’s important to use sharp tools such as bypass pruners and loppers. This will help ensure a clean cut with minimal damage to the surrounding tissue. Be sure to remove any excess leaves or twigs from around the edges of the cut area immediately after trimming – this will reduce potential infection sites. In addition, be careful not to over-prune; too much can stress out your plants and cause them to become weak and unhealthy.
Here are some additional tips for optimal pruning:
- Cut at a slight angle away from the main stem to promote healing.
- Remove only 1/3 of all branches each time you prune in order to keep balanced growth.
- Consider thinning out crowded areas instead of removing entire branches * Make sure all tools are clean and sharp to reduce the risk of disease.
Pests And Disease Prevention
Indigo plants are generally resistant to most pests and diseases, but there is still a need for prevention. Proper maintenance and care will help protect the plant from any potential issues. One of the best ways to prevent pests and disease is to keep the indigo plant in an area with good air circulation. This helps reduce humidity, which can lead to fungal growth on leaves. It is also important to inspect new plants carefully before bringing them home as they may already be infected with something.
Inspecting existing plants regularly is also key when it comes to pest and disease prevention. Look for signs of discoloration or wilting foliage that could indicate a problem. If you spot anything suspicious, remove the affected leaves or stems immediately to limit the further spread of infection. Additionally, using neem oil or other organic pesticides can help control insect populations around your indigo plant without introducing harsh chemicals into the environment.
It’s also important not to overwater your indigo plant as excessive moisture can create conditions ideal for fungus growth or root rot development. Make sure the soil drains well and use a pot with plenty of drainage holes in the bottom so excess water can escape quickly after watering sessions.
Harvesting Tips
Indigo plants are generally ready for harvest when the flowers have faded or when the leaves turn yellow. This usually occurs after several weeks of growth, depending on the plant variety and climate conditions. Harvesting should be done with care to ensure that no damage is caused to the roots or foliage. Careful harvesting will also help avoid any disease or pest infestation in future crops. Here are three key tips to remember when harvesting indigo plants:
- Cut stems at least two inches above ground level so that new shoots can emerge during subsequent growing seasons.
- Use sharp pruning shears to reduce potential damage to surrounding foliage and root system.
- Place harvested material into a paper bag or container immediately and bring them indoors as soon as possible.
Harvested materials can be used fresh or dried, depending on preference and intended use. If drying needs to take place, it is important to keep humidity levels low and temperatures consistent throughout the process; otherwise, mold may form which could contaminate the entire batch of harvested material.
To dry properly, spread out all harvested material evenly onto a flat surface such as newspaper or butcher paper then allow air circulation around each piece without crowding too tightly together; this way all pieces get exposed equally to airflow from fans or open windows. After drying has been completed, store in an airtight container away from direct sunlight until needed for further processing. With these guidelines in mind, successful harvests of high-quality indigo plants can be achieved season after season.
Propagation Strategies
Propagation of the indigo plant is an easy way to expand your garden. This can be done through stem cuttings or by seed sowing. Both methods are relatively simple and will result in a healthy, vibrant Indigo Plant for you to enjoy.
Stem Cuttings: Stem cuttings are one of the most popular ways to propagate the Indigo Plant. To do this, take 4-6 inch cuttings from new growth that has appeared on the plant. Remove any flowers, buds, or seed pods from the cutting before planting them in a moist potting mix. Place in indirect light and keep the soil lightly moist until roots appear at which point more water may be needed depending on local conditions.
Seed Sowing: Another method of propagation is through seed sowing. Collect seeds when they are ripe and separate out any foreign matter such as leaves and stems before storing them in an airtight container away from direct sunlight with some moisture absorption material like silica gel or vermiculite added.
When ready to sow, prepare a well-draining medium such as coco peat or perlite-based soilless media and sow seeds directly into individual containers (1/4-inch deep) then cover lightly with soil before misting the surface with clean water.
It’s important to keep the soil wet but not saturated while waiting for germination which should occur within 7-10 days if kept warm (around 68 degrees Fahrenheit). Once sprouted, provide adequate light either under grow lights or natural outdoor sun exposure beginning with no more than two hours daily for young plants and increasing up to 8 hours during summer months only after plants have established themselves outdoors.
Seed Saving Strategies
Saving seeds from an indigo plant is a simple yet rewarding practice. It can provide gardeners with the opportunity to grow plants that are true-to-type and have desirable traits for their particular climate or location. The first step in saving seeds is to identify which types of seeds are viable. For most species, this includes flowers that remain on the plant until they dry completely and turn brown. Once these have been identified, it is important to ensure that the pods containing the seeds do not split open too early; otherwise, there may be cross-pollination between different varieties of indigo plants.
The second step in saving indigo seeds is to harvest them at the right time. This should take place when the pod has fully dried out but before any further degradation occurs due to weathering or pests. When harvesting by hand, it is best to use gloves as some varieties of indigo have spines that can cause skin irritation. Further care must then be taken during storage as well – preferably in airtight containers kept away from direct sunlight and other sources of heat or moisture.
Finally, proper labeling and documentation will help maintain accurate records regarding each variety’s provenance and characteristics over time. Establishing a system of identification prior to planting ensures that only desired plants are propagated through subsequent generations while also providing valuable data for future research endeavors into hardy heirloom cultivars suited for modern horticultural challenges.
Other Uses For Your Indigo Plant
In Eastern medicine, Indigo has been used to treat a variety of problems. However, it is not recognized in Western medicine because of the lack of scientific evidence to support claims that this plant has medicinal value.
It is recommended that you use this plant with care because there is a danger in using it for purposes other than for dye.
Over the years, the indigo plant has been used to treat ovarian cancer, nervous system conditions, epilepsy, spleen problems, bronchitis, conditions of the kidneys and lungs, and many other conditions that have been treated with indigo.
Keep your indigo plant well-watered and in a large enough pot with good drainage. The plant should always be kept indoors, even during the warm summer months.
It is never a good idea to plant your indigo plant in the ground out of doors. The ideal location for the plant is in a greenhouse, but inside your home will also serve well if the plant is kept warm enough.
Choose a location in your home that gets full sunlight so that the plant can thrive. Keep the plant well-trimmed for the best growth in your plant.
The plant has a long and rich history. The plant has been cultivated and grown for its lovely dye and sold worldwide for thousands of years. Since its introduction to the market in the sixteenth century, it has been widely used in art and many other areas.
Chances are there is indigo used in something around you right now. When you consider how useful the plant is, you may decide that it is fascinating and beautiful to keep in your home.
Take some time to read the fascinating history of this plant, and you may decide that it is a worthwhile plant to have around for your art and craft projects. Make your dye from the plants that you grow from seed.
Read also.
Hello, we recently had five days of 25 temperature here in Houston our blue plumbago plants look bad will they return to full life or do I need to cut them back?
Hi. We also got hit hard with freeze conditions. Our Blue Plumbago plants are in bad shape.
Here’s what I am going to do. I’m going to wait until mid-Feb before I do anything. At that time I will trim off the dead growth and add some compost and quality fertilizer with higher levels of nitrogen.
This should kick start new growth. If the plants don’t show new growth in spring they may not have survived the freeze.
In the past, I’ve seen these plants rebound from harsh weather. So, don’t throw in the towel just yet.
Good luck