
Most gardeners panic when they see yellow hydrangea leaves. They reach for fertilizer, crank up the hose, or — and this is the one that really hurts — do nothing because they assume it’ll sort itself out. Here’s the thing: yellowing leaves are never random. Every shade of yellow, every pattern of discoloration, every leaf that drops early is your plant communicating something specific. The trick is learning to read it.
The good news? Most causes of yellow hydrangea leaves are completely fixable. The less-good news? Treating the wrong cause can make things dramatically worse. Overwatering a root-rot situation because you diagnosed drought stress is how gardeners lose plants they’ve had for a decade.
Yellow hydrangea leaves are almost always caused by one of six things — overwatering, underwatering, nutrient deficiency (especially iron or nitrogen), too much direct sun, natural seasonal changes, or pest/disease issues. But here’s what most guides won’t tell you:
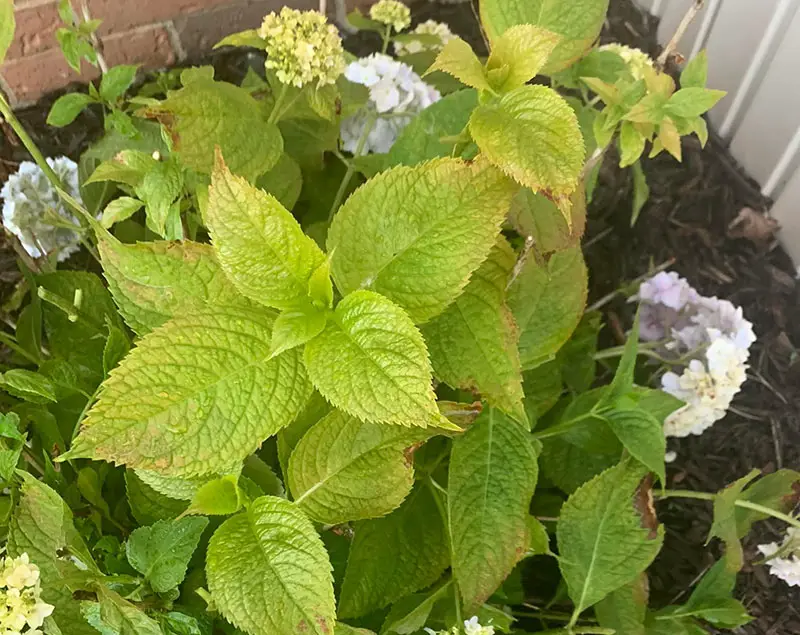
- The pattern of yellowing matters more than the yellowing itself. Yellowing between leaf veins points to iron chlorosis; yellowing that starts at the bottom of the plant suggests nitrogen loss; uniform pale yellowing across the whole plant often means overwatering.
- Soil pH is the silent saboteur. Your hydrangea might be sitting in perfectly fertilized soil and still starving, because a pH that’s even slightly off makes nutrients chemically unavailable.
- Seasonal yellowing is normal — and misdiagnosing it leads to real damage. Every autumn, hydrangeas drop older leaves. Treating healthy seasonal change as a disease problem is one of the most common mistakes home gardeners make.
The Overwatering Trap (And Why It’s So Easy to Fall Into)
Overwatering kills more hydrangeas than drought does. That’s not a guess — it’s what you hear consistently from experienced growers, and the biology backs it up. Roots need oxygen as much as they need water. When soil stays waterlogged, roots suffocate, begin to rot, and lose their ability to absorb nutrients. What shows up on the leaves? Yellowing. Which looks exactly like the plant needs more water. And so the cycle deepens.
The classic overwatering pattern starts at the bottom of the plant. Older, lower leaves yellow first and may feel slightly soft or mushy at the stem. The soil smells earthy or sour when you dig a few inches down. If you gently lift a section of root, you might find brown, mushy roots rather than firm white ones — that’s root rot, and it’s serious.
What most people miss here is the drainage factor. You can water your hydrangea perfectly and still drown it if the soil doesn’t drain well. Heavy clay soils, compacted ground, and pots without adequate drainage holes are all common culprits. The fix isn’t watering less — it’s fixing the soil structure first. Adding perlite, coarse sand, or compost to improve drainage changes everything.
If you suspect overwatering: Let the soil dry out more between waterings. Stick your finger two inches into the soil — if it still feels moist, wait. For potted plants, check that drainage holes aren’t blocked. For in-ground plants with chronic drainage issues, consider raised beds or amending the soil deeply with organic matter.
Underwatering — The Obvious One That’s Still Easy to Misread
Drought stress yellowing looks different. It tends to be crispy at the edges, starts on newer growth in full sun, and the leaves may wilt or curl before they fully yellow. The soil is bone dry an inch down. This one’s easier to diagnose, and the fix — water deeply and consistently — is straightforward.
But here’s where it gets interesting: hydrangeas are drama queens about water inconsistency. A plant that dries out completely, gets soaked, dries out again, and gets soaked again will develop stress symptoms that mimic both overwatering and nutrient deficiency simultaneously. The leaves yellow in irregular patches, growth slows, and blooms suffer. Consistent moisture matters more than total water volume.
The real-world solution is mulch. A 2–3 inch layer of organic mulch around the base of your hydrangea does more for moisture consistency than any watering schedule. It slows evaporation, regulates soil temperature, and gradually improves soil structure as it breaks down. It’s one of those interventions that costs almost nothing and fixes multiple problems at once.
When the Soil Is Lying to You: Nutrient Deficiency and pH
This is where things get genuinely fascinating — and where most gardening guides oversimplify.
Iron chlorosis is the most photogenic of the deficiency problems. The leaves turn yellow but the veins stay distinctly green, creating a kind of green lattice on a yellow background. It’s almost beautiful in a worrying way. The immediate assumption is “add iron,” and sometimes that’s right. But more often, the iron is already in your soil — it’s just locked up because the pH is wrong.
Hydrangeas prefer a soil pH between 5.5 and 6.5. Above 7.0, iron and manganese become chemically unavailable even when present in abundance. You could dump iron sulfate on your plant all season and see no improvement if the pH isn’t corrected first. Test your soil before you treat — a basic pH test kit costs a few dollars and saves you from months of ineffective intervention.
To lower pH: apply sulfur, acidifying fertilizer, or work in peat moss. Coffee grounds are often recommended, and they do have a mild acidifying effect, but they work slowly and shouldn’t be your primary approach for serious pH problems.
Nitrogen deficiency shows differently — a general yellowing that starts at the bottom (oldest) leaves and moves upward. The plant looks tired and pale rather than specifically patterned. This is common in containers (where nutrients leach out with every watering) and in sandy soils that don’t hold nutrients well. A balanced slow-release fertilizer in spring handles most nitrogen issues. Avoid over-applying, though — excess nitrogen pushes leafy growth at the expense of flowers and can burn roots.
Magnesium deficiency is sneaky. It looks like iron chlorosis (yellowing between the veins) but tends to show up on older leaves rather than new growth. Epsom salt (magnesium sulfate) dissolved in water and applied as a foliar spray or soil drench can correct this quickly.
Sun Stress: The Problem Nobody Suspects Until Summer
Hydrangeas occupy a strange position in garden design. They’re often marketed as shade plants, which isn’t entirely accurate — most varieties do fine with morning sun and afternoon shade. But in full, blazing summer sun, especially in warmer climates, they struggle. Leaves yellow and bleach out, often with a burned, papery look at the edges.
The tricky part is that sun stress develops gradually. You plant your hydrangea in spring, it thrives through the mild months, and then July arrives and suddenly something seems wrong. The location hasn’t changed. The watering hasn’t changed. But the sun intensity has, and the plant is telling you.
If relocation isn’t possible, shade cloth during peak summer hours (typically 2–6 PM) can make a real difference. Consistent mulching helps keep roots cool. And some varieties simply tolerate sun better — Annabelle, Incrediball, and the Panicle hydrangeas (Hydrangea paniculata) are considerably more sun-tolerant than the classic Bigleaf (H. macrophylla) varieties.
Natural Leaf Drop vs. Something Actually Wrong
Every autumn — and sometimes in late summer — hydrangeas shed their older leaves. This is completely normal. The leaves yellow, sometimes with irregular patterns, and fall. The plant is simply redirecting energy toward roots and next year’s growth.
The way to tell the difference: seasonal yellowing tends to affect the oldest, lowest leaves first and progresses predictably. The newer growth at the branch tips stays healthy. The plant overall looks fine — no wilting, no unusual spots, normal growth elsewhere.
Compare this to a problem yellowing: random distribution across the plant, affecting new and old growth simultaneously, often accompanied by spots, unusual textures, or a generally stressed appearance.
A lot of well-meaning gardeners treat autumn leaf drop as a disease, dosing their plants with fertilizer in September and October when the plant is naturally winding down. Late-season fertilization with nitrogen can actually push new tender growth that gets killed by the first frost, setting the plant back rather than helping it.
Pests and Disease: When Yellow Has Spots
Yellow leaves with brown spots, ring patterns, or powdery coatings are in different territory from nutrient and watering issues.
Cercospora leaf spot produces purple or brown spots with a yellow halo — the yellowing surrounds the spot rather than being the primary symptom. It spreads in humid conditions with poor air circulation. Removing affected leaves, improving airflow, and applying a copper-based fungicide handles most cases.
Powdery mildew gives leaves a whitish, dusty coating before they yellow and drop. It’s common in conditions where days are warm and nights are cool. Baking soda sprays (1 tablespoon per gallon of water, with a drop of dish soap) are a decent organic intervention for light infestations.
Spider mites cause a distinctive stippled yellowing — hundreds of tiny pale dots across the leaf surface. Turn a leaf over and look for fine webbing. A strong spray of water dislodges mites effectively; neem oil or insecticidal soap handles more serious infestations.
Root aphids are less visible but create yellowing and general decline that looks like a nutrient or watering problem. If you’ve corrected everything and the plant still declines, gently disturb the soil around the base and look for small, pale insects clustered on the roots.
A Diagnostic Framework You Can Actually Use
Stop, look, and answer these questions before you do anything:
Where is the yellowing?
- Bottom/oldest leaves → likely nitrogen deficiency or natural senescence
- New growth at tips → iron chlorosis or intense sun exposure
- Random throughout plant → watering stress (over or under) or disease
- Patchy, with spots → fungal or bacterial disease
What pattern does the yellowing follow?
- Yellow leaves with green veins → iron or magnesium deficiency (check pH first)
- Uniformly pale, washed-out → nitrogen deficiency or overwatering
- Yellow edges with green centers → sun scorch or underwatering
- Stippled, dotty yellowing → spider mites
What does the soil tell you?
- Soggy, slow-draining, sour smell → root rot risk, ease off water
- Bone dry, pulling away from pot edges → drought stress, water deeply and mulch
- Normal moisture → check pH and nutrients
When did it start?
- Mid-summer heat → sun stress or inconsistent watering
- After heavy rain → possible root rot beginning
- Autumn → probably natural
Once you’ve answered these, your treatment path becomes clear. Most of the time, you’ll land on one or two likely causes rather than a confusing range of possibilities.
Treatment at a Glance
| Cause | Key Sign | Fix |
|---|---|---|
| Overwatering | Lower leaves yellow, soggy soil | Improve drainage, reduce watering frequency |
| Underwatering | Crispy edges, wilting, dry soil | Water deeply, apply mulch |
| Iron chlorosis | Yellow leaves, green veins, new growth affected | Test and correct pH first; then add chelated iron |
| Nitrogen deficiency | Pale, tired-looking, starts at base | Balanced slow-release fertilizer in spring |
| Sun stress | Bleached, papery, worse in afternoon | Move to part shade or provide afternoon cover |
| Seasonal drop | Oldest leaves only, autumn timing | Nothing — it’s normal |
| Fungal disease | Spots, rings, powdery coating | Remove affected leaves, improve airflow, fungicide if needed |
| Spider mites | Stippled dots, webbing underneath | Water spray, neem oil or insecticidal soap |
The Bigger Picture
Hydrangeas are remarkably resilient plants when their basic needs are met. Most yellowing problems, even ones that look alarming, can be reversed with the right diagnosis and consistent attention over a few weeks.
The pattern that comes up again and again in cases where gardeners really struggle is treating symptoms rather than causes. Fertilizing an overwatered plant, watering more when the issue is drainage, adding iron when pH is the problem — these interventions feel logical in the moment but delay real recovery.
Give yourself permission to go slowly. Make one change at a time. Soil pH correction plus a new watering schedule plus a fertilizer application all at once makes it impossible to know what worked. Adjust, observe for two to three weeks, then adjust again if needed.
Your hydrangea has been communicating with you all along. Now you know what it’s saying.
Based on aggregated horticultural research, university extension service guidelines (including recommendations from North Carolina State Extension and the University of Georgia Extension), and documented field observations from home garden troubleshooting. Soil pH guidance references standard recommendations for Hydrangea macrophylla and related species. Always test your specific soil conditions before amending.
