Forget the buzzing pumps, the grow tents, and the chemistry degree you don’t have. There’s a forgotten loophole in hydroponics so passive it feels like cheating: no electricity, no timers, and it fits inside a mason jar. Developed decades ago by a University of Hawaii horticulturist, the Kratky method lets you grow crisp, perfect lettuce on a sunny windowsill for less than the price of two salad bags. Here’s how to unlock a fridge full of greens with almost zero work.
There’s a version of hydroponics so passive it doesn’t even need a pump. No electricity. No timer. No fussing. A University of Hawaii horticulturist named B.A. Kratky figured it out decades ago, and the home-growing community has been quietly obsessing over it ever since — because it actually works, especially for lettuce, and especially in mason jars.
The Kratky method suspends plants above nutrient-rich water in a sealed container. Roots drink from the solution while an air gap forms naturally as water depletes — no pump needed. Lettuce goes from seed to harvest in roughly 30–45 days.
But here’s what most guides skip over:
- The air gap isn’t just convenient — it’s load-bearing. Mess with it accidentally and you’ll drown your roots before you realize what happened.
- Water quality matters more than the nutrients you add to it. Hard tap water can sabotage pH before a single seed sprouts.
- Lettuce varieties behave very differently in Kratky jars. Butterhead forgives beginner mistakes. Romaine does not.
Why Mason Jars Are Secretly Perfect for This
Wide-mouth quart mason jars are practically engineered for the Kratky method — they just weren’t designed for it intentionally.
The opaque or light-blocking potential of a painted jar prevents algae from colonizing your nutrient solution (algae competes with roots for oxygen and nutrients, and once it starts, it’s relentless). The wide mouth accommodates a standard 2-inch net cup, which sits snugly like it was made to order. The glass doesn’t leach chemicals into your solution the way some plastics do. And the lid, even unused, reminds you to keep evaporation in check.
In practice, a single quart jar comfortably supports one full head of leaf lettuce. Scale to a half-gallon jar if you’re growing butterhead or any variety that spreads wide. The principle stays identical.
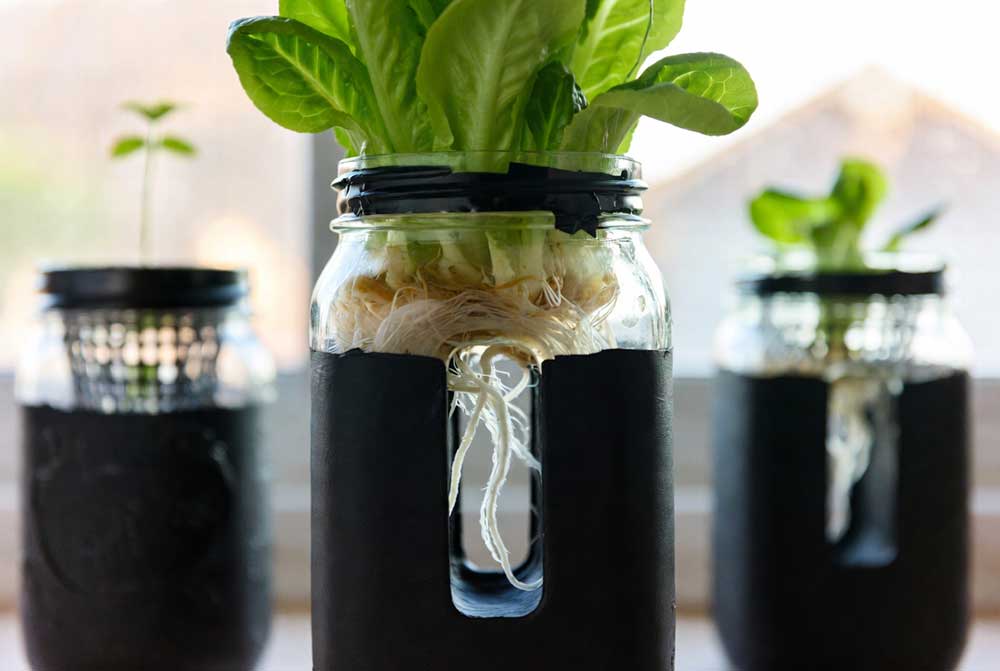
One thing growers consistently underestimate: the value of painting or wrapping those jars. Clear glass lets light penetrate the solution, and where there’s light and nutrients, algae blooms. A coat of spray paint — matte black on the outside, optional white on the inside for light reflection — takes three minutes and saves endless headaches. Spray paint specifically formulated for glass is ideal, but standard exterior spray paint holds fine once fully cured.
The Kratky Method, Explained Without the Chemistry Lecture
When you fill a mason jar with nutrient solution and suspend a seedling above it, the roots dip into the water and begin drinking. As the plant consumes the solution, the water level drops — and here’s the elegant part — that dropping water level creates a gap between the surface and the net cup. That gap is oxygen-rich air. The roots that were submerged start to develop air roots in this zone: thicker, fuzzier, more efficient. The roots still touching water keep drinking. The system essentially breathes on its own.
This is why the Kratky method is called “non-recirculating passive hydroponics.” There’s no pump pushing solution around. No timer cycling anything on and off. The plant manages its own environment through the act of growing.
Where beginners go wrong: they top off the jar too frequently, or they top it off to the wrong level. If you refill the solution all the way to the net cup every time it drops even a little, you never allow that air gap to form. The roots suffocate in anaerobic conditions and rot. The plant dies looking oddly healthy from the top until it suddenly collapses — which is maddening to diagnose if you don’t know what caused it.
The rule: only refill when the water level has dropped at least an inch below the net cup, and never refill past that one-inch mark from the cup’s base. Once the air gap forms and the plant establishes, it becomes self-regulating.
What You Actually Need to Get Started
No grow lights required if you have a south-facing window. No pH meter required if you use quality filtered water. Here’s the honest minimum:
The non-negotiables:
- Wide-mouth mason jars (quart size to start)
- 2-inch net cups (pack of 10 on Amazon runs under $5)
- Hydroponic clay pebbles or rockwool starter cubes
- Hydroponic nutrient solution — General Hydroponics Flora Series or MaxiGro work reliably; so does the simpler Masterblend 4-18-38 combo for lettuce
- Lettuce seeds (loose-leaf varieties like Black Seeded Simpson or Red Sails are the most forgiving)
- Spray paint to block light (or black electrical tape wrapped around the jar)
What makes a genuine difference but isn’t mandatory:
- A pH meter or pH test drops (target 5.5–6.5 for lettuce; most filtered water lands around 7.0, which is slightly high but survivable)
- pH Up/Down solutions to adjust
- A TDS/EC meter to check nutrient concentration (lettuce thrives around 840–1260 ppm, or roughly 1.2–1.8 EC)
What you don’t need, despite what some guides insist:
- An air pump or air stone
- A grow tent
- Expensive full-spectrum grow lights for a single jar near a window
- Distilled water (filtered tap is fine; unfiltered tap is where you gamble)
The total startup cost for four jars — fully equipped with nutrients, seeds, and a basic pH testing kit — runs $30–45. That’s the entire first season covered.
Step-by-Step: From Seed to Salad Bowl
Step 1: Germinate your seeds
Soak a rockwool starter cube in pH-adjusted water (6.0 is ideal) for 30 minutes before using it. Drop 2–3 lettuce seeds into the pre-made hole on top of the cube. Cover loosely and set in indirect light. Germination happens in 2–5 days for most lettuce varieties. Once you see a tail (radicle) pushing out the bottom of the cube — roughly ¼ inch long — the seedling is ready for the jar.
Don’t skip the pre-soak. Dry rockwool straight from the bag has a pH near 7.5, which stresses seedlings immediately and delays root development by up to a week.
Step 2: Mix your nutrient solution
Follow the manufacturer’s dilution rate for “seedling” or “vegetative” stage — typically half-strength for the first two weeks. For Masterblend 4-18-38, a common starting recipe is: 2.4g Masterblend + 2.4g Calcium Nitrate + 1.2g Magnesium Sulfate per gallon of water. This lands around 900–1000 ppm, which is ideal for young lettuce.
Mix in a separate container first. Check pH. Adjust if needed. Then fill your jars.
Step 3: Set up your jars
Fill each painted jar so the solution level sits at roughly ¾ full — the net cup, once inserted, should have its bottom ½ inch submerged in the solution. This is the starting condition. Once that air gap forms naturally (within a week or two), you’re in the maintenance phase.
Place the rockwool cube containing your germinated seedling into the net cup. Surround it with moistened clay pebbles to stabilize it. The cube itself should contact or nearly contact the nutrient solution.
Step 4: Find the right light
Lettuce wants 12–16 hours of light and doesn’t need intense direct sun — it actually bolts (turns bitter and goes to seed) under excessive heat. A south-facing windowsill works in most climates from spring through fall. In winter or in apartments with limited light, a simple T5 fluorescent or LED grow light positioned 4–6 inches above the jars on a 14-hour timer is more than sufficient.
Temperature range: 60–75°F (15–24°C) is ideal. Above 80°F consistently and your lettuce will bolt regardless of everything else you do correctly.
Step 5: Monitor without obsessing
Check your jars every 3–4 days. You’re looking for: water level (dropping as expected = healthy consumption), root color (white or cream = healthy; brown and slimy = root rot from insufficient air gap or bacterial contamination), and leaf color (pale yellow-green = likely nitrogen deficiency or pH drift; deep healthy green = all good).
The most common beginner intervention: topping off too eagerly. Resist it. Trust the method. The air gap is doing something important.
Step 6: Harvest
Most loose-leaf lettuce reaches full harvest size in 30–45 days from transplant. You have two options: harvest the entire head by cutting at the base of the net cup, or harvest “cut and come again” — snipping outer leaves while the center continues growing. Cut-and-come-again extends your harvest window by 2–3 additional weeks easily.
When Things Go Wrong: Real Patterns Worth Knowing
Yellowing lower leaves, good upper growth: Normal in maturing lettuce. The plant is reallocating nutrients upward. If it’s happening to young plants under 3 weeks, suspect pH drift.
Brown, mushy roots: Classic sign the air gap never fully formed, or the jar was overfilled during a top-off. Unfortunately, once root rot establishes in a passive system, recovery is difficult. Start fresh with that jar, and this time — don’t top off until a clear air gap exists.
Leggy, pale seedlings reaching toward the light: Insufficient light intensity or duration. Move closer to the window or adjust your grow light lower.
Lettuce that tastes bitter before it looks done: It’s bolting, usually from heat or from age. Harvest immediately — it won’t improve. Next cycle, keep temperatures cooler and harvest a few days earlier.
Algae coating the roots and jar interior: Light is penetrating the jar. Check for cracks in your paint or gaps where light enters around the net cup. A strip of black electrical tape around the top is the quick fix.
The Decision Framework: Is the Kratky Method Right for Your Situation?
| Your situation | Kratky in mason jars: good fit? |
|---|---|
| Limited counter or windowsill space | Yes — one jar = 3–4 inches of footprint |
| Zero experience with growing anything | Yes — forgiving, slow to fail catastrophically |
| Want to grow tomatoes or peppers | No — fruiting plants exhaust Kratky nutrient reservoirs too quickly |
| Living in hot apartment (80°F+) without AC | Risky — lettuce bolts; try again in fall/winter |
| Want herbs like basil or cilantro | Yes — basil is especially reliable in Kratky jars |
| Traveling frequently for 1–2 weeks at a time | Yes — the passive system handles short absences well |
| Hoping to grow year-round in a dark apartment | Only with a grow light; otherwise seasonal |
What to Expect After Your First Harvest
The first successful Kratky jar does something to your perception of what’s possible in a small space. Suddenly you start counting windowsills differently.
A logical progression: start with two jars of Black Seeded Simpson lettuce (fastest, most reliable), then add one jar of butterhead (slower, more rewarding texture), then experiment with a jar of basil (different nutrient needs — use a slightly higher concentration, around 1400–1600 ppm). Within a month, you have a functional micro-garden that costs less per week in produce than a single grocery store salad bag.
The deeper implication of the Kratky method is that it removes the biggest barrier to home growing — the daily maintenance requirement. You check it when you feel like it. It doesn’t die if you forget for four days. That forgiving feedback loop is what turns people who’ve killed every houseplant they’ve ever owned into confident growers.
Growing food changes your relationship to it in a way that’s genuinely hard to articulate until you’ve done it. The lettuce from your jar tastes better not because of nutrient ratios or controlled conditions, but because you watched it happen from nothing. That part doesn’t show up in any grow guide — but it’s probably the most compelling reason to try.
Sources and methodology: Kratky method principles derived from B.A. Kratky’s original research publications through the University of Hawaii Cooperative Extension (2009–2016). Nutrient concentration ranges based on widely cited hydroponic lettuce research from Cornell University’s Controlled Environment Agriculture program. Practical failure patterns reflect commonly documented issues across home grower communities with thousands of documented Kratky grows. Starter cost estimates based on current retail pricing on major e-commerce platforms as of 2024.