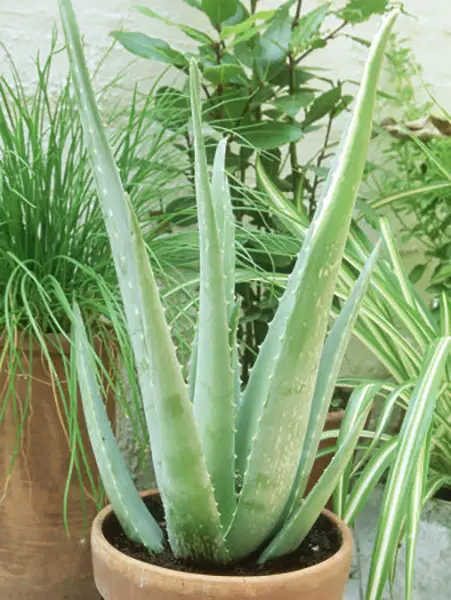
Aloe Vera plants are straightforward to grow and cultivate. The only requirements include good drainage, mild temperatures, and occasional watering since aloe vera is of the cactus family.
For your information, there are over 250 aloe species, and most of them are native to Africa. Sizes range from tiny plants all the way to gigantic plant colonies. Since aloe vera plants are succulent plants, they do best in areas with no chance of frost. The plants are 95% water, the reason they are highly susceptible to frost.
As house plants, aloe vera plants are an excellent addition. During the winter, they thrive indoors, and in the summer, putting your aloe vera plants outdoors is definitely a treat for them. If you live in a climate conducive to these plants, make sure you plant them in the sunny areas of your garden.
They will tolerate partial shade, but if you do plant them where the sun is available all of the time, then make sure you water them more often, but only once the soil is dry.
Different Species Of Aloe Vera Plants
What are the different species of Aloe vera plants? Are they all beneficial? What are some of their distinct features? What is their common attribute?
Aloe vera species are extensively cultivated as ornamental plants at home, in the garden, or the pots. Aside from their decorative attribute, they are also very beneficial for medicinal and cosmetic uses.
The plant can be easily grown at home and use the fresh gel its leaves provide for burns and other wounds. The thick and bitter sap that it produces promotes healing and reduces inflammation of the wound.
Do You Know The Different Aloe Vera Plants?
There are 400 aloe vera species of genus Aloe. Some of the important ones are as follows:
- Aloe vera Barbados aloe, you can find this in the northern part of Africa with various medicinal use.
- Aloe dichotomy, commonly found in South Africa and Namibia, is known as quiver tree or poker boom having its bark and branches used by bushmen to make quiver for their arrows.
- Aloe variegate, known as tiger aloe and can also be found in South Africa.
- Aloe arborescent miller, widely used in health care because of its medicinal properties.
- Aloe wildii has a grasslike appearance and can also be found in Africa.
- Aloe aristata, known as torch plant, lace aloe with flower-rich nectar that easily attracts bees, birds, and wasp.
- Aloe ngobitensis, a species found in Kenya.
Some aloe vera plant species are being used to provide advantageous products for human consumption, such as health drinks, commercial beverages, and tea. They are all rich nutritional diets.
If you have aloe vera plants in your area, whatever species may that is, you can benefit from their cosmetic and medicinal uses.
What Kind of Soil Can Aloe Vera Plants Grow In?
The plant needs to be moderately fertile and fast draining. So the best soil would be the sandy loam with good drainage. If your soil is more clay-like, then you can’ mix the soil with some gravel. In this way, it will improve the drainage.
Should drought become an issue, a well-established plant will survive far better than a transplant, which you should give more water. Watering is done by soaking the soil and then letting the soil dry in between successive watering.
Baby aloe vera plants grow at the base of a mature plant. These little aloe vera plants can be transplanted when they are approximately 15cm in height. Planting them deeper in the soil will ensure a good root system, but more importantly, the plant has enough space between other plants since the roots grow vertically.
Blossoms should be cut so that the energy is directed to develop better the leaves where the medicinal wonders are located.
Aloe Vera is Very Easy to Grow
Remembering that they are part of the cactus family should help you remember not to overwater them as they are already made up of 95% water. Overwatering them would eventually cause the leaves to rot and the roots if subjected to standing water.
When growing aloe vera plants, you can take advantage of a soothing plant to skin scrapes and other minor injuries. It is a wonderful compliment to flowering plants, providing a pale to the deep green backdrop. Even in a garden where other succulents grow gives it a showy desert-like display.
By following growing recommendations, you will soon find that aloe vera plants are an addition to your garden that you will appreciate for years to come and an excellent testimony to your “green thumb.”
Things to Consider When Growing Your Aloe Vera Plant Indoor
As for Aloe vera, aside from buying commercialized products made out of the plant, you can also grow a plant for yourself. So, what are the things that you must consider in growing and taking care of the plant?
You should consider these things:
- In climatic conditions, aloe vera is nearly 95% of water, making them not a habitat of cold regions but tropical and sub-tropical regions. Hence, it is best to plant it in full sun or through a window with proper sunlight, providing just the right water.
- The soil type must be moderately fertile and fast draining to provide enough water to the soil as fast as possible.
- Pots and planter, you must choose a wide planter for the roots, and the pot should have a drainage hole.
- Cold season precautions, watering should be very minimal and don’t water the plant until you find its soil to be completely dry.
Can Aloe Vera Grow From a Cutting?
The answer is yes and no. Even though it may grow from cutting, but the percentage of failure is quite high. If you want less hassle, you are better off by propagates aloe vera via pupping or seed. It has certainly been my experience that it is much quicker to grow aloe vera from pups than seed.
How To Grow Aloe Vera Plant From Pup
Part of why I’ve kept growing aloe veras for all these years is that mine has always made new plants really readily, and it means I wind up with more than once, so I’ve never lost an entire type on the rare occasion when I have a plant die.
My original aloe vera is very stalky with short stubby leaves. It produces baby plants from off the main stem, which detaches as fully-formed baby plants. If you stick the stem end in dirt and *don’t* water it for about four to six weeks, it will probably root itself. If you water it before it forms roots, it will rot and die.
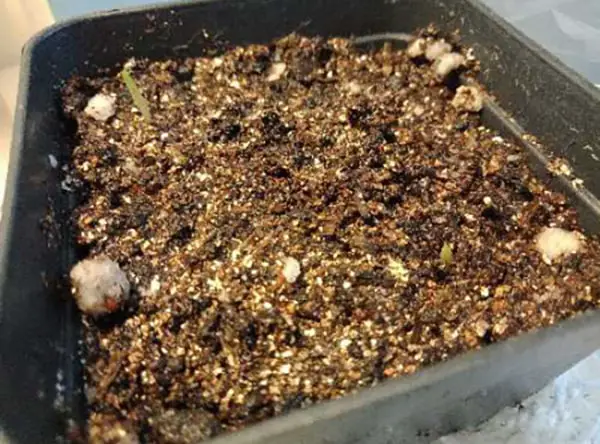
The “Cthulhu” aloe reproduces by sending up new baby plants from the roots. They start poking up underneath the parent plant and then rapidly grow in size. (shown here, a few new plants just starting to show) When I’ve wanted to make more of this type, I let them grow to be about 3″-4″ tall, then I cut this way down at the roots where they attach to the parent and move them to their own pots of dirt.
Again, I don’t water them for the first 4-6 weeks and see if they establish. This one starts with so many shoots. I actually get rid of most of them. I gave them away for a while, but now that all my friends have one, it’s harder to find folks to give them to.
How To Grow Aloe Vera From Seed
Aloe can be sown and reproduced in spring. The germination temperature of the seeds is 15-20°C, you should prepare the materials for sowing in advance. Let’s take a look at the steps on how to grow aloe vera from seed.
1. Sowing time
The best time to sow the aloe vera seed is in spring from March to April, and the suitable temperature for germination is 15-20°C.
2. Seed preparation
For the seeds of aloe vera, choose those that are healthy and full. In addition, before sowing, the seeds can be sterilized with disinfectant.
3. Seed germination
Before sowing the seeds, soak them in warm water. The amount of water is enough to submerge the seeds. You can place tissue paper under the seeds to help the germination.
If the temperature is above 16°C, the seeds will sprout slowly in about a week, and you can plant the seeds into the soil at this time.
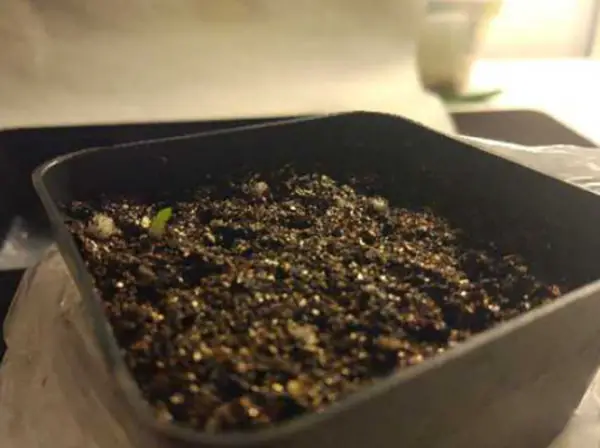
4. Pot soil preparation
Prepare a plastic pot for growing seedlings. You can get a mixture of peat soil, plant ash, and sandy soil. Before planting, expose the soil to the sun for disinfection and sterilization.

5. Seeding process
Put the soil in the plastic pot and level the soil surface to make it flat. Then carefully pick the aloe seeds onto the soil surface with a toothpick. This is the avoid the damaging of the sprouts of the seeds during the transition.
When the seeds of aloe vera have transferred to the pot, cover the surface of the seeds with a thin layer of soil. Remember not to cover it too thick. After planting the seeds, put them in a cool place and taking good care of them.
6. Caring of Your Pot
After sowing, the ambient temperature again should be controlled at 15-20°C. If the indoor temperature is too high, you need to move the pot to other areas with a cooler temperature. If the temperature is too low, you will need to turn on the heater.
After planting, the seeds will germinate in about 1 week.
If there is not enough sunlight, you can use grow light. The grow light also can be used to prevent the seedlings from growing sideways.
If you turn on the heating in winter, you can properly open the windows for ventilation, giving the seedlings a good growth environment.
Should I Water Aloe Vera in Winter?
The quickest way to kill your Aloe Vera plant is by overwatering it. The best practice is to let the soil dry out between waterings and hard water in winter. But how do you estimate “hard water” at all?
I’ve found it best to give my plants a good soaking every couple of months over the winter months. So on a nice sunny afternoon, I take them outside and fill their pots to the brim with water [rain water if you have it].
If I have some cacti, feed I’ll water that in to just for good measure. Alternatively, a good liquid fertilizer a couple of times over summer, especially if Aloe Vera grows in a pot.
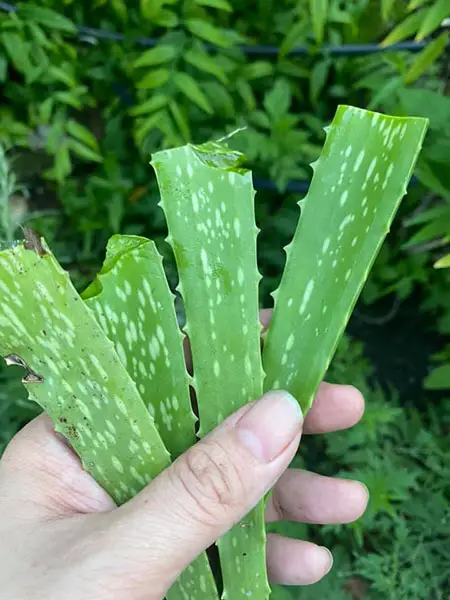
How to Grow Aloe Plants From Leaf Cuttings
Even though aloe vera require little water to survive, you must remember to water them every few weeks. Besides, they need to be re-potted regularly. I re-pot my plants every year or so. In general: plants need about as much volume above the ground as below. So give them space.

But for aloe, I tried growing an aloe leaf and failed. It was rooted, but somehow it did not survive. The only thing I can come up with is that I gave it too much water. To find out what I did wrong with my aloe offshoots, I kept notes and followed instructions where I could find them.
The conclusion after all my trials is pretty simple: trust the aloe cutting or offshoots to take care of themselves: put them in soil and leave them alone. Once they start growing, they have roots, and then you can start watering them as you would an adult plant: i.e., not too much.
The thing to remember with all succulents is that they have their own water supply, so they do NOT need you to supply water all the time.
Aloe warning signs
If the soil is moist, but the plant is shrinking, it’s probably suffering from rot. What I do is hope that time will dry out the soil and the plant will survive.
The way to guarantee the plant will die is to give them MORE water.
A more drastic measure is to throw away the soil you put it in, give it new soil, and not water until the plant starts to grow again (wait at least a week or two).
The biggest risk for most people in dealing with succulents is OVER watering, not lack of water.
Aloe is a bit more vulnerable: starting from a leaf or stalk
Starting an aloe seems a bit harder, from my experience, than starting succulents in general. The following tips make sense (I’ll let you know what worked when it has):
- Let the cutting dry, so the wound is healed.
- Put the cutting halfway in the soil. That way, it can grow roots along a large surface area, and the chances of it surviving are higher. It does not need more than an inch or so above the ground to get sunlight.
Online people talk a lot about how overwatering is a problem. Maybe I tried too hard and should have just let it go… as I usually do with my (many) succulent plants. In other words: do NOT water more often than the mother plant? What they say is water too much, and it will not grow roots. Oh, and watering too much may make the plant grow orange.
Then again, some say that you should put the cutting in the soil in a plastic bag and just be patient. I mean – really… months? As a compromise, I’ve decided to put the smallest cutting in the soil with the plastic bag while the bigger one gets the open air and water irregularly treatment.
But for more contrary advice: some people say that you can just put the cuttings in the soil and leave them alone for months and they’ll be fine—NO WATERING at all for months.
Now I’m baffled.
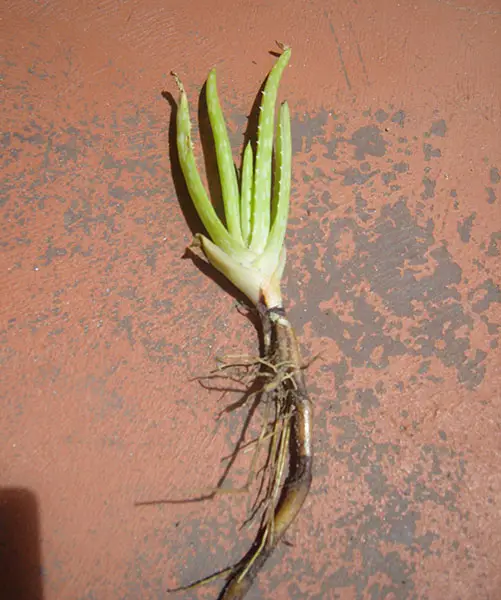
Starting Aloe From ‘Terminal Cuttings’ or Offshoots
Healthy aloe will grow offshoots within a year or so. These are, by all accounts, the best way to grow new aloe. I’ve got two in pots right now. Unfortunately, mine broke off without any roots. Ideally, you’ll start with a terminal cutting that has roots already formed.
Also, the best time to break them off is apparently in spring or summer. Aloe is dormant in winter. However, I’ve got two cuttings in pots now, though it’s autumn, and I hope they will grow.
I’ll let you know what happens. The ideal size for a cutting is, so everyone says, 2 to 4 inches. That is 5 to 10 cm. I started with one of about 4 cm and one of 6 cm. We’ll see. If the sources are right, my larger cutting is more likely to survive.
Some people say to just let the aloe offshoot and wait for them to get big enough to have roots of their own, as in 4 to 5 inches, or at least as wide as your hand. You can then ‘tease them out. That procedure would have certainly saved me a lot of trouble.
The ‘baggy’ method – fungus on the soil
After a week, I looked at my two plants, and one had dry soil, so I watered it. The cutting looks fine: green and not dried out at all.
The one that had been in the bag looked equally happy: also green, also not dried out. BUT the soil it was standing on did not look so good. Obviously still moist, it had developed a fungus. So I’m terminating that experiment. This cutting is now given the same treatment as the other one:
Simply being in soil and watering at most once a week.
Three months later, both Aloe shoot-offs are still alive
Looking at both my cuttings, it’s clear they’re still alive.
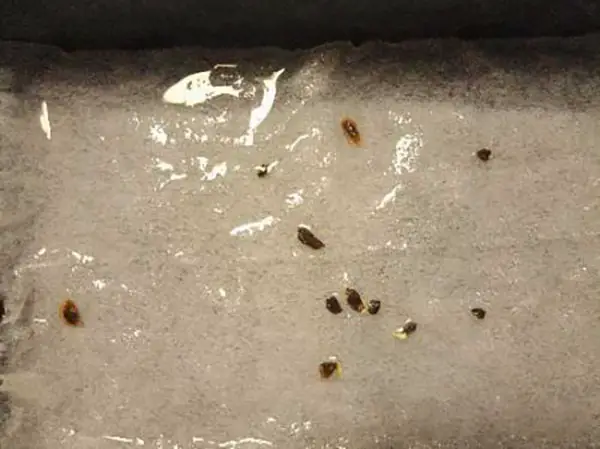
The (aborted) baggy method has left that cutting alive, but with some type of small insect running around in the soil. I’ll have to be careful when repotting them both to ensure the insects don’t spread to my other plants. I’ll also be looking into methods to get rid of them.
The biggest danger to aloe cuttings is too much water like it is to other succulents. The baggy method will not do any good: you only risk creating a nursery for fungus and insects.
The ‘don’t water at all for months’ method.
After three months, my offshoots are well but not visibly growing. That is: with water about every two weeks, they’re still alive, but I’m not sure there are any roots.
So, I’m starting to suspect the ‘don’t water for months to be sure they get roots’ method is good. It’s just: I can’t bring myself to do that. Since the original plant has developed a new offshoot, I suspect that will be my next experiment. That is: if I can bring myself not to water a plant.
Still, this experiment is going better than my last: both are still alive.
4 months later: baggy method does have advantages
I looked at both my aloe cuttings this week. That is: I took them out of the soil. I was cautious, but there was no sign of roots on either.
However, the one you started with the baggy method has more signs of roots forming: the bottom is thicker and perceptibly larger than when I started. After four months, it still has so few roots that it was easy to simply take it out of the soil with the bugs in it and start over in a clean pot with fresh soil. I guess I could have done that earlier.
I think with Aloe, you just really have to be patient. I now understand why not watering for months is a viable option. It’s not one I’m brave enough to try, but I did put the cuttings back into the soil without watering them at all.
So, I do think perhaps the best method is this:
- Put the aloe cutting in the soil in a plastic bag for about a month.
- Get it out: get rid of the soil and whatever bugs and fungus may have developed.
- Put it in fresh soil, in a clean pot.
- Water every two weeks or less, till you’re sure, you see it grow.
- Water every two weeks.
How To Grow Aloe Vera Plant in Pot With Enough Space
I have an aloe vera plant that is growing up tall and slim. I am afraid it will break under its own weight, so my plant is leaning on a wall. At first wonder how I can make it grow wide and big with such strong stems in my pot.
Then, I figured out some tips after consulting with a few experienced gardeners. I would share with you here to grow massive plants and not lose control of them.
The first tip for growing a huge plant is to make sure your aloe is in a large and deep pot. A well-developed root system is necessary for a large plant to be able to not only grow but to stay alive and healthy.
The next thing you need to do is make sure you rotate the pot regularly. Plants like sunlight, and they will grow in the direction of the brightest light. This can make them lean very sharply towards a window or even a lamp in a really dark room.
If you have a plant growing at a really funky angle, turn the pot so that the plant is leaning away from the light.
This will make it start to grow back in the direction of the light, and it will slowly start to move back to being more upright. When the plant is back to being upright, don’t let it just keep going and wind up growing out of whack again.
Make sure to turn the pot about a quarter turn once per month. This allows each side of the plant to get its turn in the sun and keeps the plant more or less centered and pointing up. When the plant gets even light all around, the whole thing can grow better.
The third “trick” is to water your plant regularly. Aloe vera plants are indeed known as being very drought-tolerant, but that just means they can survive in conditions without much water. It doesn’t mean they thrive and grow perfectly under those conditions.
While they are hardy houseplants that can stand up to neglect well, if you want a really huge and happy one, you have to take care of it.
A Three-Color Theory of Aloe Plant Health
I’ve learned most of my aloe vera growing know-how through trial and error. Fortunately, aloes are very hardy plants, and I’ve found it’s often easy to fix a problem and not actually kill the plant. Just looking at the plant’s color and touching it can give you a good idea of how it’s doing.
GREEN
Healthy aloes are most often green, ranging from pale green to darker greens. If you pinch the leaves or spines with two fingers, they feel substantial and juicy.
YELLOW
If one of my aloe plants turns yellowish, it’s often suffering from one of two problems. One is that the plant isn’t getting enough light. The second is that the plant might be getting too much water. It will be up to you to decide which you think is happening. The color will shift to a yellow-green before turning really yellow and will often start to shrivel up from the tips of the spines moving in towards the main plant.
Make sure the plant can dry out in between waterings and try to give it more daylight. Aloes will sometimes terminate the ends of longer or larger spines when resources start to drop off. Watch for multiple spines developing creases and then dropping off the ends of the spines.
RED
Some aloes naturally have a touch of red at the tips of their spines, but if the plant starts to become reddish or red overall, it’s most often a sign that the plant is getting too much sunlight. Although known as a solar plant, some aloes prefer bright but indirect sunlight.
If the tips start to shrivel up along with turning red, try and move the plant to have a little less sun. If just one single leaf/spine turns red and shrivels up, this is the plant naturally pruning itself. This is how the older leaves die off by themselves.

How to Harvest Aloe Vera Gel
There really are only two things to remember when harvesting aloe vera gel:
- Let the yellowish (or reddish, depending on the kind of aloe) moist drip out of the plant for 15 minutes or so.
- You want the white, translucent inside of the leaf, not the green.
To do this, you take the fattest leaf at the bottom of the plant. Cut it off with a sharp knife. Using a blunt blade will wound the plant unnecessarily. Let the leaf stand with the cut down for 15 minutes to let the unwanted sap get out.
Then use a knife to cut the green apart from the inside. There are several methods to do this, but the main thing is really just this: cut close to the rim not to lose any of the gel. Don’t keep any of the green in: it’s not good for you.
Use a bit for cuts and bruises you have at that moment, put away the rest in a refrigerator and keep it cool. Like with fruit, the way to keep it from turning brown is to add a bit of acid, like citrus, to the can. Since this is an oxidizing effect, make sure the aloe gel is in a closed container.
There are all kinds of ways to make sure your aloe cuttings survive. Getting them to take root is another matter. It turns out that the desert method is best: simply starting not giving them water at all, even if they shrink a bit, till they start growing.
But the thing I’ll be doing next time is even simpler: I won’t get the cuttings out of the mother’s pot till they’re strong enough to make it on their own. That is: when they have roots.
Things to watch out for when starting an aloe vera plant:
- Give as little water as you dare till the plant starts growing.
- Using a plastic bag as a greenhouse will likely make more fungi and insects than roots grow.
- This is potentially a very sturdy plant. Trust it to be able to survive on its own.