So you’ve taken all the precautions, you’ve been diligent in checking your plants, and you even treated your greenery with a miticide last month. Yet despite all of that, you’re now beginning to see the signs of a new spider mite infestation.
What to do? Relax.
Finding spider mites on houseplants does not necessarily mean the end of the world. All you need is the right product and a good strategy, and you can be mite-free in a relatively short amount of time.
Spider mites are invasive little creatures that are merely a nuisance to homeowners. But they can be devastating to farmers and horticulturists if they can do their dirty work unchecked. To keep them from being a problem in your garden or home, there are some things you need to do:
- Learn to recognize the warning signs
- Separate infested plants
- Treat the infestation
- Carry on with follow-up treatments for future prevention
What Are Spider Mites?
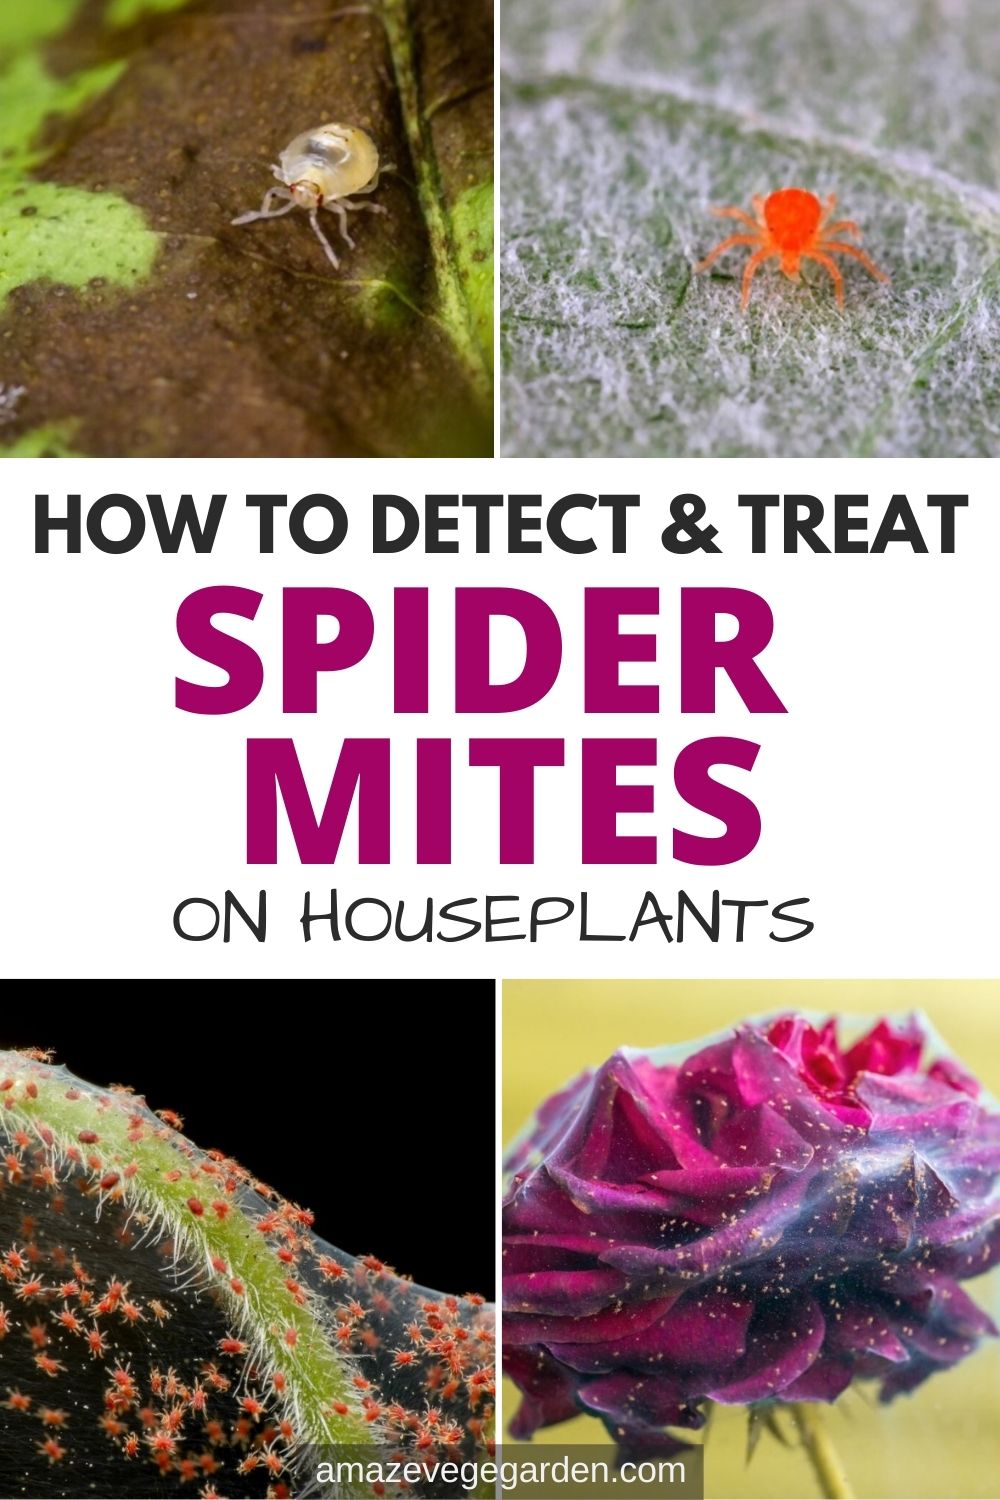
Spider mites are small arachnids that feed on plants, causing damage to foliage and discoloration. They have eight legs, two body parts, and a pair of antennae. While the most common species is the red spider mite, there are other varieties with different colors such as yellow or green. Spider mites reproduce quickly in warm conditions and can become an epidemic if not dealt with promptly.
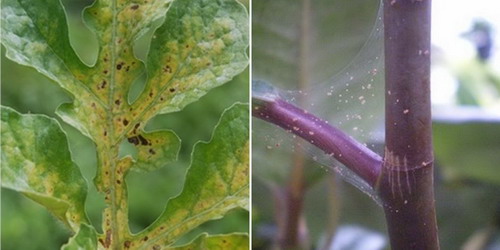
Plants affected by spider mites will show signs of wilting leaves, drying up, stippling (small punctures) along veins, and webbing on stems and undersides of leaves. These pests suck out plant juices from within cells using their sharp mouthparts; they inject enzymes into cell walls which break them down for easy digestion. As a result, the area around each bite becomes white or off-colored due to chlorosis caused by a lack of nutrients needed for photosynthesis.
In addition to direct feeding damage, spider mites produce honeydew excrement which attracts ants and fungi which can further harm your houseplants. Therefore, it is important to detect spider mite infestation early so treatment can be started immediately in order to save your beloved houseplant before it’s too late.
Early Detection of Spider Mites
Early detection is the key to successful treatment, and nowhere is this more evident than in the control of spider mites. Spider mites are prolific little pests found in every corner of the world, damaging crops, household plants, and ornamentals daily. The peak season for mites is during the hottest and driest months of the summer and year-round indoors.
Most farmers are already well versed in these pests and know full well how to deal with them. The same cannot be said about many home gardeners. So for us, new farmers, a successful plan to kill mites requires early detection and diligence. This starts with a daily examination of all your plants by simply turning over the leaves and observing what you see. You’re looking for specific signs that tell you spider mites have arrived on the scene.
The Warning Signs
A good number of people who suffer from serious spider mite infestations claim they knew all of the warning signs before yet were still unsuccessful in preventing a full-scale infestation. That may very well be true for many of them.
But others only know what to look for after the spider mite infestation has gotten out of control. There are early warning signs that you can use to identify an infestation while still in its early stages.
Since spider mites are so tiny, they’re very hard to see and identify in the early stages of an infestation.
What to Look For
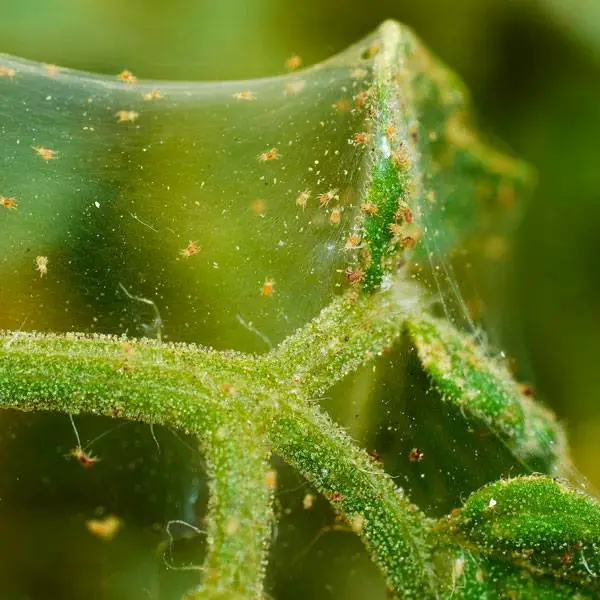
In the earliest stages, all you should notice are little dark specks on the underside of your plant leaves. The protection of the underside of leaves makes it a perfect home for spider mites to begin their feeding frenzy.
Female spider mites, which caused most of the problem, aggressively lay eggs as they move around the plant. Since the eggs are one-tenth the size of a mite, you probably won’t see them with the naked eye, but you should see the tiny little dark specks that are mites.
To confirm a spider mite infestation without magnification, hold a plain piece of white paper underneath the plant and gently tap on the leaves. If those in dark specks are indeed spider mites, they will fall to the paper where they can be more easily identified.
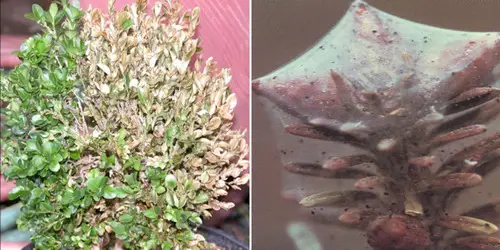
As an infestation progresses, you should notice several other things. First and foremost is a general discoloration, then tiny white dots scattered over the leaf’s upper surface. As the infestation advances, you will also notice fine silk-like webbing and ‘tenting’ on foliage.
In the most advanced stages of the infestation, you will clearly see entire sections of a plant void of any color and vitality.
How to Get Rid of Spider Mites on Houseplants
For many home horticulturists, houseplants are one of the most beautiful decorations to have around the house. But like any foliage, they are susceptible to the feared spider mite, an invasive species that seems to do very well in the same environments where plants thrive.
If your bushes experience a spider mite infestation, you must be diligent but careful to rid yourself of these pests. There are several methods you can use in combination to solve the problem.
Watering Your Plants Frequently
Spider mites reproduce and spread most readily in areas where temperatures are above 70°F and moisture is low. That’s why areas like Texas, Arkansas, and Southern California have a high incidence of spider mite infestations.
One of the simplest things to stave off an infestation is regularly watered your plants and keep the surrounding soil damp. In hot environments, you should use plenty of mulch to hold moisture in.
When you water your houseplants, make sure you thoroughly soak all of the leaves and stems. Petals are not as much of a problem, although they can be, because spider mites prefer to live on the undersides of leaves. By making sure leaves and stems are soaked, you will be washing away mites, their eggs, and any invitation for the pests to return.
Also, be sure to water first thing in the morning and in the early evening to allow your plants to drive before sundown.
Spray With Water
The first step in treating spider mites on houseplants is to spray the plant with a strong jet of water. This method helps dislodge and wash away any pests present, as well as debris from their webs or eggs. It should be done thoroughly, focusing especially on the undersides of leaves where they are known to live.
The water pressure should be adjusted accordingly depending on the size and type of houseplant; smaller plants require less aggressive spraying than larger ones. Additionally, it is important to spray more frequently during hot weather when such pest problems tend to increase.
When applying this treatment, one must ensure that all areas of the plant have been reached by the stream of water. Every effort should be taken to avoid damage to delicate foliage or stems while still providing enough force for effective control. If there is stubborn webbing or other signs of infestation visible after spraying, additional steps may need to be taken before moving onto insecticidal applications.
Prune Your Plants
It is important to prune your plants regularly in order to prevent spider mites from infesting them. Pruning can help remove damaged leaves and stems, as well as reduce the amount of foliage that may harbor pests. This will also ensure that all parts of the plant receive adequate light and air circulation for healthy growth.
To properly prune your plants:
- Begin by cutting off any dead or diseased branches with a pair of sharp scissors or pruners.
- Remove any yellowed or browning leaves, but leave green ones intact if possible.
- Trim back overgrown stems and foliage to encourage new growth while maintaining an attractive shape.
Regular pruning helps promote healthier roots and overall plant health so they are better able to withstand attacks from harmful insects like spider mites.
Apply Insecticides
The sun, the wind, and the rain – are integral elements of nature that have a symbiotic relationship with plants. They bring life to them and give them sustenance. But sometimes, they can also bring death in the form of spider mites. These tiny arthropods feed on plant sap and weaken their vitality, leading to premature wilting or yellowing of leaves. To protect houseplants from such infestations, insecticides must be applied as soon as possible.
Insecticide sprays should be administered once every two weeks for three consecutive treatments in order to eradicate any existing spider mite populations on houseplants. The formulations used must contain an active ingredient like abamectin, bifenthrin or permethrin which will act quickly against adult spider mites as well as larvae and eggs hidden beneath foliage surfaces. Careful attention is required when applying insecticides near areas where pets may enter since some could be toxic if ingested by animals and humans alike.
Once the application has been done correctly according to instructions on product labels, it is important to monitor further development of the situation closely so that additional treatments would not be necessary unless absolutely necessary. With timely precautionary measures in place, this tedious pest can finally be kept at bay.
Use Horticultural Oils
Horticultural oils are a form of pest control that can be used to effectively treat spider mites on houseplants. Horticultural oil is derived from refined petroleum or vegetable-based sources, and when applied correctly it can provide effective control without causing damage to the plant.
There are two types of horticultural oils – dormant oil and summer oil. Dormant oil should only be used during the plants’ dormancy period in spring or fall, while summer oils can be used anytime throughout the growing season. Here’s how to use them:
Dormant Oil
- Mix 1 part oil with 4 parts water in a spray bottle & shake well before application.
- Spray liberally over all foliage until runoff occurs.
Summer Oil
- Follow the same measurements as above, but mix 2 parts oil with 3 parts water instead of 4.
- Apply lightly and thoroughly cover any visible pests.
It’s important to note that both forms of horticultural oils have an effect on beneficial insects as well as targeted pests, so comprehensive coverage is critical for proper pest management. These oils also need to be diluted properly according to manufacturer instructions for maximum effectiveness and safety for both you and your plants.
Applying too much could cause burning or discoloration of leaves, so it’s best to start low and then work up if necessary. After applying either type of horticultural oil, monitor closely for signs of insect activity and reapply if needed at 7-10 day intervals until no further active infestations are seen.
Spray With Plant-Based Miticides
From the gardeners’ perspective, spraying a plant-based miticide can be likened to an artist’s brush – it is an essential tool for protecting plants from spider mites. This method of pest control involves using a solution of insecticidal soap or neem oil that targets and kills the pests while having minimal impact on beneficial insects in the environment.
When preparing to spray, it is important to take into account both the type of plants being treated and their size. For larger plants, such as trees and shrubs, use a backpack sprayer with sufficient pressure and volume so that foliage is completely covered with the solution. Smaller houseplants may require less coverage; therefore, it is best to use a hand sprayer or aerosol container designed specifically for this purpose.
It is advisable to test any pesticide before applying it extensively by conducting spot tests on several leaves first. To ensure effectiveness against spider mites, repeat applications may be necessary. As part of integrated pest management practices, rotating different types of miticides will provide better protection than relying solely on one product alone.
How To Prevent Spider Mites
In order to prevent spider mites from infesting houseplants, there are several steps that should be taken. Firstly, it is essential to inspect plants for any signs of the presence of spider mites before bringing them into a home or business environment. If visible damage is observed on leaves or stems then these plants should not be purchased and brought indoors.
Secondly, regularly checking new and existing houseplants for signs of an infestation can help detect the issue early and allow treatment to begin as soon as possible. Lastly, reducing humidity levels in households and greenhouses will reduce the likelihood of a successful egg-laying by female mites; therefore preventing the further spread of the pest.
It is also important to provide appropriate care for houseplants so they remain healthy and happy – this includes providing adequate light, moisture levels, nutrients, and temperature conditions conducive to plant growth. A well-maintained plant is better able to resist insect pests such as spider mites than one which has been neglected or under stress due to poor environmental conditions.
Additionally, keeping plants away from air conditioning vents or other sources of the draft may help reduce potential problems with spider mites. Finally, introducing beneficial insects into indoor environments can assist in the natural control of many crop pests including spider mites; however, it is important that only species native to the local area are used otherwise they may become invasive themselves.
Did you find this post useful? Would you like to get back to it later? Save THIS PIN below to your garden tips and pest control boards on Pinterest! Thanks 🙂
Read also: