I want to share with you the easy steps to winterize your sprinkler system during the winter season.
The first thing you need to do is find your pressure vacuum breaker, which is normally located on the side of your house.
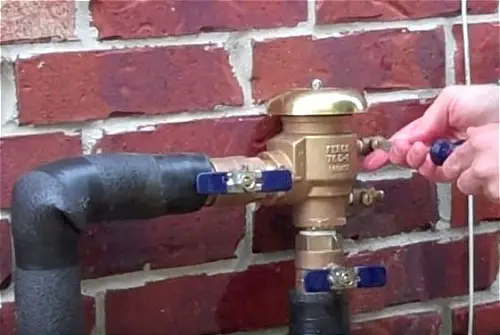
Second, turn the valve that goes straight down completely off from the water supply line. By doing so, it will take the water off from coming to your irrigation system.
Third, check that the side of the valve has a test port and what you need to turn each of them off with a screwdriver that places at an angle of 45 degrees.
What it’s going to do is to release the pressure from the system and actually drain the housing inside the valve. This is the most vulnerable part where the brass between the pipe connections is very easy to get freezing water inside. This can make the sprinkler crack, and you are going to get a problem.
Additionally, you can get foam insulation if your sprinkler system didn’t have one. You can found one at any local hardware store. Buy one and install it on the system. Make sure it is located nicely and securely with all exposed parts are being covered.
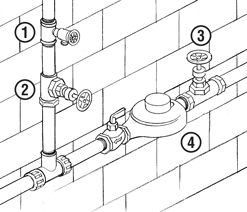
image from Hunter
1. Boiler Valve
2. Irrigation Shut Off Valve
3. Main Water Shut Off Valve
4. Water Mete
While you can find the controller usually set up inside the garage or mounted outside of your house, you may get inside and manually go to each zone and each station to relieve the pressure. What we are trying to do so there may still be some water inside the pipes.
You shouldn’t be so worried about that. We don’t want it to be under pressure again. If water inside the pipes is under pressure and you can break them easily because the pipes get full expanding.
This process takes a few minutes for the pressure to take off. Once the pressure is taking off, you can trip the switch to the off position, and you may close the controller cover.
Then you may go back to the PVB and check the vacuum breaker. The last step is to turn the valve off. That is the supply line to your actual irrigation system. You may put a towel or a jacket over the top of the valve to keep it as warm as possible.
How to Turn On Sprinkler System?
When spring is coming after a long winter, you should start inspecting your water irrigation system. You may go to your front yard and find the irrigation control valve box. First, you want to make sure that the drain is shut properly with a pair of channel locks, or you can use your hand to tighten it.
The next thing you will do is go outside your sprinkler valve cover boxes that make the backflow and make sure some stuff is shut out there, which you will check right now.
Locate your backflow prevention device, which is on the side of your house. In most cases, there is a 3-flow water line up in the basement, which is designed so that your household water doesn’t get affected by your sprinkler water system. This ensures no sucking air from sprinkler lines into your faucet.
So you may want to get to your back for a minute, and you want to get to the test fitting, which is in line over the wintertime. This means they are open in line, and the opposite is close, so before you turn your water on, you come out with a screwdriver to turn opposite to the pipe to shut them off.
The new handles are sometimes half-on, so you want to turn it to make it in line with the pipes. So now the backflow is ready to be charged with water. Another thing you may have to do is locate your valves sprinkler boxes down the drain.
You will need to find the drain handle sometimes is across like the royal blue handle. Just make sure that the drain is open well when you turn on the water before the sprinkler system flows through to another box with a blue handle.
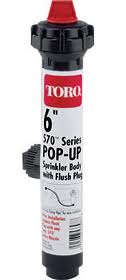
Toro Sprinklers
Extreme and even freezing temperatures can wreak havoc on your irrigation system and cause irreparable damage. Your irrigation system represents a significant investment and therefore requires that you not only perform regular maintenance checks but winterize your system if you live in an area where you experience freezing temperatures. We will discuss the necessary steps that you should observe to winterize your Toro sprinklers.
Read also: Winterize Various Herbs In Your Herb Garden
Winterize Your Toro Sprinklers
The first step in the winterizing process involves safety. It would help if you always exercised extreme caution when preparing your system for the winter. Preparation activities include the use of high-powered blowers that can send debris flying through the air.
Goggles should be worn as well s protective gloves, and you should never stand directly over any components such as pipes, valves, or sprinklers as you could be in the direct line of any debris that you might extricate.
Once you’ve observed the safety precautions, you should then turn off the supply of water going to your irrigation system. You should protect the main shut-off valve from freezing, and you can accomplish this by wrapping the valve tightly with some form of insulation such as foam insulation, electrical tape, or even a plastic bag. You should also insulate any exposed piping. Foam insulating tape is the best for this type of job.
The next step is to shut down the controller if your system is automatic. If your controller comes equipped with a “rain-mode,” you should set your controller to this mode so that only signals are shut down, but the controller maintains the present time settings and retains all program information.
Control Toro Sprinklers Pump

If your controller controls the pumps and the valves, it would be a good idea to disconnect the wiring that links to the pumps to prevent accidental activation of the pumps resulting in overheating.
If your controller does not come equipped with a “rain mode,” you will need to shut the entire system down and reprogram any cycles and timings when you reboot your system in the spring.
As the next step, you will need to examine the pipes to ensure no leftover water in the pipes. Water left in the pipes during cold winters will freeze and expand, causing the pipes to crack. This type of damage is irreparable and will require that you replace your piping in the spring before starting up your system.
To avoid this, you need to drain your pipes thoroughly. You can use two methods to drain your pipes effectively. The first is using the drain valves to let the excess water flow manually out of the pipes. The second is by blowing the water out using an air blower.
This is where your protective gear will really come in handy. With your goggles in place, you can get a regular leaf blower and attaching it to one end of the pipe to engage the system to blow any excess water out.
The last step in winterizing your Toro sprinklers is to protect and insulate your valves and preventers. Insulation tape or even foam insulation works well for this project. Take care not to block the air vents to discourage the growth of mold. Drain the preventer backflow outlets.
After doing this, you are done and ready to close up shop for the winter. By winterizing your Toro sprinklers, it will be as good as new when you reactivate your system in the spring.
Read also: Top Winter Gardening Tips
We have Toro sprinklers and this is such a big help to us. Thanks a lot!