Irrigation system technicians understand that common sprinkler system problems can be a source of frustration and wasted resources. While the consequences of these issues are serious, there are ways to quickly identify and effectively address them.
The initial step in identifying and solving any problem with a sprinkler system is understanding its components. Sprinkler systems involve pumps, valves, pipes, timers, and various other parts which all need to function properly in order for water delivery to occur correctly. If any component fails or becomes blocked it may cause disruption in the entire operation.
In addition to malfunctioning components, misaligned nozzles, improper pressure levels from pumps, poorly maintained filters, and leaks at connections can also lead to operational failures. These conditions present unique challenges when diagnosing performance issues because they often require different approaches for resolution depending on their scope and complexity. Understanding how each issue impacts the overall functioning of a sprinkler system is essential in providing effective solutions.
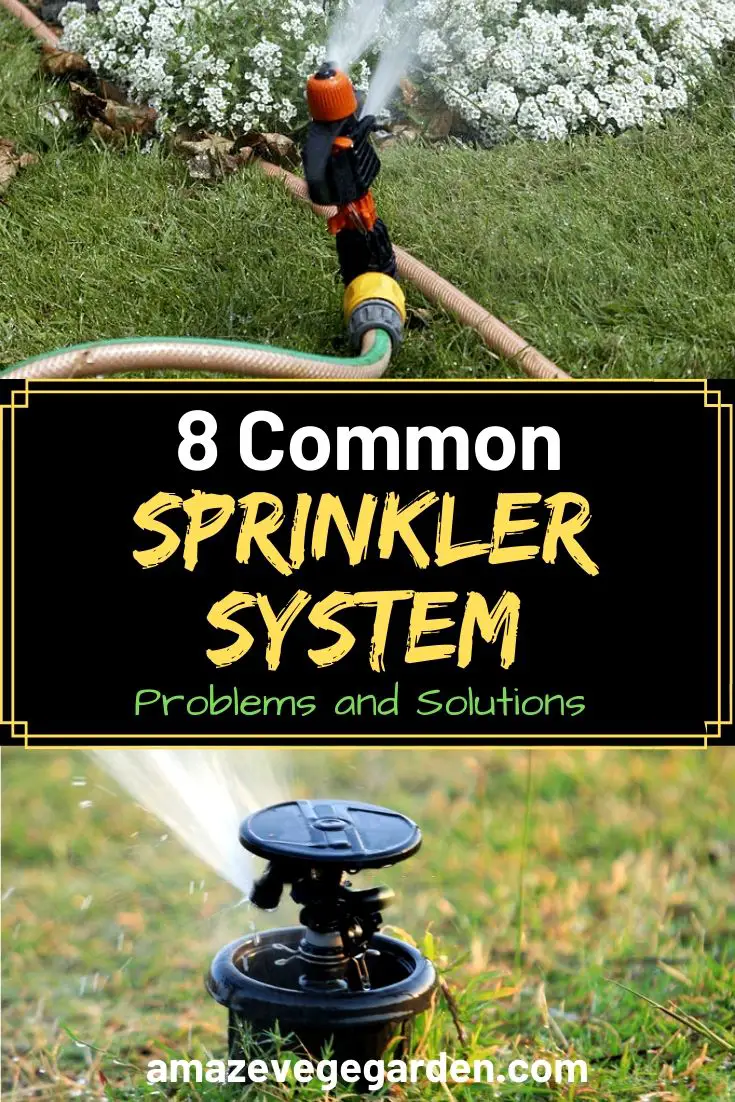
Basic Sprinkler System Components
Here is a list of the basic sprinkler system components:
Mainline – This is the main water source or pipe that leads from the street into your house. This pipe is used to feed water into the sprinkler system when needed. If the water to the house is turned off, then the sprinklers will not work either.
Sprinkler Valves – Valves are like the ones on your kitchen or bathroom sink. They basically open and close to allow water to feed into the sprinkler pipes. Sprinkler valves can be either manually turned on by hand or connected to an automatic clock.
Sprinkler Pipes – These tubes act like highways to bring the water to the sprinkler heads. Sprinkler pipes can be routed in various paths that can help or hurt your sprinkler system if not planned properly.
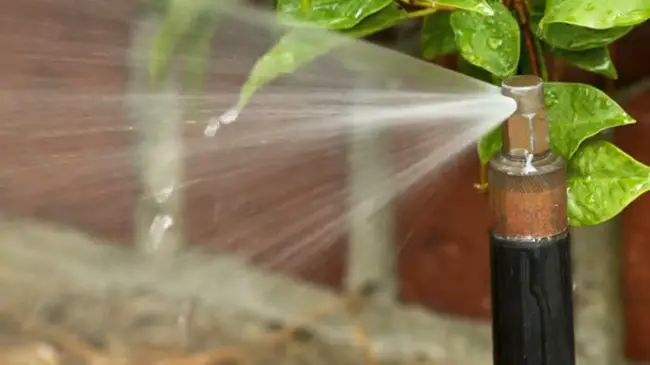
Sprinkler Heads – Normally, these are the only parts people see popping up and spraying water (hopefully!). There are several types of sprinkler designs and styles, depending on your yard. Also, that means there can be several sprinkler problems too.
Timers and Clocks – One of the advantages of using an automatic sprinkler timer or clock is that you can set your sprinkler times and watering duration. Now you can be at work, in bed, or simply watching tv and not worry about forgetting to water the lawn!
Sprinkler Valve Problems
The sprinkler valves can be the most costly sprinkler problem to deal with. They are the heartbeat and gatekeepers of your sprinkler system because they control the water flowing through your pipes. They can also be the most complicated components because they have internal valves and external connections.
You can open the valve within a sprinkler clock manually with a handle or, more commonly, a solenoid on top. When a low voltage is applied to the solenoid, it magnetically opens and allows the water to flow.
You should connect two wires from the sprinkler clock to each solenoid, a common and a hot wire. These are fairly small wires, and pets or people can rip them off during weeding.
One positive aspect of sprinkler problems related to sprinkler valves is that most valves and solenoid parts can easily be unscrewed and replaced without buying a completely new unit.
Also, the parts are interchangeable, so if you want to swap one solenoid that you know works onto a questionable valve, all it takes is to screw it on hand tight. Sometimes the rubber valve inside of the valve body gets drily rotted or ripped. This can also be replaced with a screwdriver and an inexpensive replacement valve.
Sprinkler Head Issues
Sprinkler problems may first be seen by bad spray patterns or completely broken sprinkler heads. If they are snapped off, you will even get your own “Old Faithful” geyser every morning. The most common sprinkler problems related to the heads are clogged or broken off.
There are many sizes and brands, but they usually consist of a body and a spray head. If the entire head is run over or kicked off, you may be able to screw the body back onto the pipe elbow in the grass. Sometimes, a lawnmower or other tool hits the actual spray head, and water shoots out of the crack.
If the spray pattern is shallow or looks odd, debris or rocks can sometimes be lodged in the spray nozzle itself. You can unscrew the spray nozzle and use water or a screwdriver to remove any small items.
Once in a while, you may need to adjust the small screw found on the top of the sprinkler to increase the spray amount, pattern, or flow. This can be performed by using a tiny screwdriver or even a butter knife to turn the screw. If you have a new sod lawn, you do not want your hard work to go down the drain with a few sprinkler head issues.
Sprinkler Pipes
Broken sprinkler help can be a mysterious and annoying type of sprinkler problem because the pipes are underground for the most part. The good news is that if the break is after the valves, the old term “It only leaks when it is on” is a funny mantra.
A dead giveaway that the sprinkler problem is pipe-related is if the sprinklers have a tiny spray pattern or suddenly have shallow water pressure. This is because most of the water is running out of the crack or break in the pipe and does not have enough pressure to blast out of the sprinkler head itself. Look for areas that may be a clue as to where the pipe is broken. Pipes often break near the driveway where cars may have run them over by accident while pulling out.
Once you locate the break, do yourself a favor and dig back along the pipe at least a foot or two on both sides. Broken pipes are actually easy to fix, but the cramped area makes it harder than it needs to be. Here are some steps to fixing a broken sprinkler pipe:
- Dig the area with plenty of elbow room, about one foot all around the pipe.
- Turn off the water at the valve.
- Cut the pipe on both sides of the break with pipe cutters or a rope-style string saw.
- Measure and test the slip-fix.
- Glue in the slip-fix and let it dry for 30 minutes before turning on the water.
One last tip! Do not cover the pipe until you have turned the water on to ensure you are good to go.
Sprinkler Pipe Glue
One way to avoid sprinkler problems is to make sure your pipes are properly glued. Although the main sprinkler problem related to the pipe is an actual broker pipe, loose or poorly glued, pipes can be a huge sprinkler problem. Some people think it is acceptable to push the pieces together and let the dirt hold them together! Please do not take this route…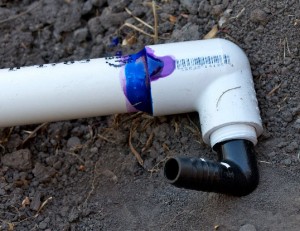
Sprinkler pipe glue is very affordable. Just be aware that it is a chemical, and you should follow the direction listed on the bottle. One tip is to make sure you have a rag with you and work over the dirt to avoid staining your sidewalk or driveway with blue sprinkler pipe glue.
Be generous, and don’t be afraid to be messy. Remember, the pipe will be buried in the dirt, so no one will ever see your messy glue. Using glue and ensuring your pipes are secure is one major way to prevent sprinkler problems and save you time troubleshooting issues.
Sprinkler Solenoid Basics
At some point, sprinkler problems will involve replacing or checking your sprinkler solenoid. Although that sounds technical, think of a sprinkler solenoid as an electric door that pokes the valve to let the water run. It consists of a body with a spring-loaded pin. The body will have two wires attached.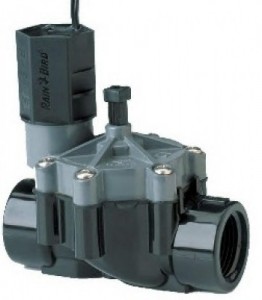
Either you can connect wire to the sprinkler clock hot and common wire, and when the low voltage from the clock is applied, the plunger retracts, allowing the valve flap to open on your sprinkler valve. When the sprinkler clock time end, the low voltage current stops, and the solenoid pin pushed the valve closed because it is spring-loaded.
If you think you have a sprinkler problem related to the solenoid, first check that the wires are still connected tightly. You can even use wire strippers and re-twist them using a wire nut to ensure a good connection. Sometimes pets running through the bushed can rip the wires out and render it useless until you fix it.
If that does not fix the sprinkler problem, there is easy to determine if the solenoid needs to be replaced. Unscrew a working solenoid from the valve next to it and attach it to the first valve. If the original valve starts to work after connecting the wires, you need to replace the solenoid. They are very inexpensive, and this is something you can fix yourself with a quick trip to the parts store. Remember to bring your original solenoid to make sure you purchase an exact match.
Read also: How To Winterize and Turn On Sprinkler System?
Sprinkler Stations
Because of water pressure and layout, most sprinkler systems are broken down into stations. Not only does this help with efficiency, but it can help narrow down what part of your system is causing sprinkler problems. Since each valve, pipe, and sprinkler head is sectioned off from each other, it can save you time knowing what pieces are related to the station causing you problems.
If you have a station dedicated to the parkway near the street, likely there are only about 5-10 sprinkler heads and one valve. If you need to troubleshoot an issue, don’t waste your time looking around the entire yard. Focus on the last sprinkler in that station and work your way toward the valves. Now you only have to worry about a small part of your system rather than wasting hours.
If you do not have time to fix the issue, you can turn off that specific station on the sprinkler clock and allow the others to run. This will give you time to work on the sprinkler problem while the other sections of your yard still receive their normal watering schedule.
Sprinkler Wires
If you have sprinkler problems that you feel could be related to the sprinkler wires, there are a few things to check before you rule this component out of your troubleshooting. In a nutshell, the sprinkler wires carry a low-voltage current from the sprinkler clock to the valves when it is time to turn on the sprinklers.
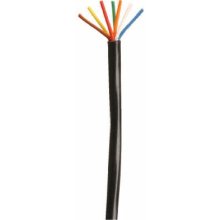
Each valve has a “hot” wire connected to one side and a common wire. Typically in a bundle of sprinkler wires, you will want to make the white wire the common to keep things consistent. Sprinkler wires can cause sprinkler problems when the wires are loose or maybe not be corrected in the right manner.
Dogs and kids could be running through the bushes and ripping them out or wiggling them loose. They should be connected with a wire nut, so take it off and make sure it is nice and tight.
Also, check the connections to the sprinkler clock, which is terminated with a screw or connection that should be tight. If you have been digging in the yard recently, make sure that a shovel did not cut the wires. This should help you decide if your sprinkler problems are related to the wires.
Timers and Clocks
Sometimes it may seem like your grass is dying due to sprinkler problems, when in reality, it could be that they are not turning on at all! If your clock is not set properly or the wires are connected wrong, you will certainly have problems. Sprinkler clocks basically send a low-voltage current to the sprinkler valves to open them.
A sprinkler timer has controls on the face that can be manual switches, but recently most manufacturers use an LCD. Timers are sold with a predetermined number of stations so that you can use extra slots for future use.
A power cord plugs into a regular outlet and a bank of connections for your sprinkler valve wires to connect to. The bank will consist of a row of either screws or clamp-style connections.
When troubleshooting sprinkler problems related to the clock or timer, there are a few tests you can do to rule this component as the cause of your sprinkler problems…or an innocent bystander.
- Make sure the timer is plugged in and on.
- Check both the hot wires and common wires to ensure they are connected.
- Test the timer can send a current by using a “manual” feature to run the sprinklers while you watch
Low Water Pressure
Low water pressure is a common problem in sprinkler systems and can lead to poor irrigation performance. One of the most frequent causes of low water pressure is inadequate pipe size, which may be due to clogged pipes or an undersized piping system. The best way to diagnose this issue is by checking the flow rate with a flow meter, taking into account all possible sources of resistance along the line. If there are any unusual readings, the technician should check for blockages or breaks in the pipes. Additionally, it’s important to ensure that all associated valves are open when testing for leaks.
Another potential cause of low water pressure could be insufficient pump capacity or malfunctioning control valves which regulate the flow of water through the system. To troubleshoot this issue, technicians must verify whether the pump provides a consistent output and that no air bubbles are entering from faulty valves or incorrect installation techniques.
This will help prevent further damage caused by long-term exposure to low levels of pressure. In addition, regular maintenance checks should include assessing both piping and pumps for proper operation; ensuring they provide adequate performance for optimal watering results.
Malfunctioning Control Valves
Malfunctioning control valves can be a major problem in sprinkler systems. According to recent estimates, approximately 40% of all residential and commercial irrigation system failures are related directly or indirectly to faulty control valves. This is due to the fact that most sprinklers rely on these components for proper operation. As such, it is important for property owners and maintenance technicians alike to understand what causes malfunctioning control valves so they can take appropriate corrective actions if necessary.
The main cause of failing control valves is improper installation or setup. If the valve has not been properly seated into its housing, then it will likely fail sooner rather than later as there may be leaks or other issues with the seal. Furthermore, inadequate lubrication and poor water pressure can also lead to premature failure of the valve itself. Finally, incorrect settings can cause problems when trying to operate the system – from inconsistent watering cycles to misdirection of spray heads – leading to subpar results and wasted resources.
In order for an irrigation system to function correctly, it must have a reliable set of functioning control valves that are installed properly and adjusted according to manufacturer specifications. It is always best practice for experienced professionals to install these components whenever possible in order to ensure optimal performance over time. With regular maintenance and repair work, any malfunctions should be able to be identified quickly and addressed before causing further damage or disruption within the overall sprinkler system setup.
Clogged Nozzles And Hoses
Clogged nozzles and hoses are a common issue in sprinkler systems. Most clogs occur due to debris buildup, such as dirt, leaves, and grass clippings, which can block the flow of water through the system. Clogged nozzles may result in an uneven distribution of water or cause water to be released too quickly from certain areas, resulting in inefficient irrigation. Hose connections can become blocked with sediment or scale build-up over time, reducing their effectiveness. Poor maintenance practices, such as not replacing filters regularly, can lead to more frequent clogging issues and reduce the life expectancy of your system.
To prevent these problems from occurring it is important to regularly inspect all components for any signs of damage or blockage caused by debris buildup. Proper filtration techniques should also be employed when installing new equipment. By taking proactive steps to avoid clogged nozzles and hoses you will ensure that your sprinkler system remains working efficiently for years to come.
Poor Coverage From Sprinklers
After dealing with clogged nozzles and hoses, the next hurdle to tackle is poor coverage from sprinklers. Sprinkler systems can experience weak or uneven distribution of water due to various factors such as nozzle size, pressure fluctuation, and improper spacing between heads. This leads to inefficient use of the system’s resources and results in dry spots on lawns that cannot be remedied by adjusting the irrigation schedule. To ensure optimal coverage throughout a given area, it is important for technicians to understand how each component affects performance.
The first step towards solving any issue related to sufficient coverage is confirming the proper functioning of all components involved in the distribution: nozzles, filters, valves, controllers, etc. If these are all working correctly—and if there isn’t an obvious physical problem like broken lines—the technician should focus their attention on determining what combination of factors might be causing insufficient water delivery from head to head within a given zone.
This includes evaluating pressure levels around the entire system; ensuring that multiple zones have adequate space separation; verifying that spray patterns overlap one another without excessive gaps; and checking for leaks near fittings or pipes connected to the main line.
Depending on the complexity and scope of problems encountered during testing, adjustments may need to be made at different points along the way in order to reduce overspray onto impervious surfaces while maximizing watering efficiency across a wide range of soil types in residential settings or commercial venues alike.
With careful analysis and experimentation based on detailed soil mapping data provided by customers, technicians can apply best practices tailored specifically for every situation they encounter when resolving issues concerning poor coverage from sprinklers.
Seeping into this subsequent section about leaking heads or drip lines is an understanding that only well-executed repairs will truly solve underlying issues rather than just patching up surface symptoms temporarily.
Leaking Heads Or Drip Lines
Leaking heads or drip lines are common sprinkler system problems. Leaks occur when the water pressure is too high, when debris accumulates in a head or line, or when an O-ring seal wears out. High water pressure can cause erosion to the seals and eventually lead to leaks. Debris buildup inside a head or line can restrict flow and also cause leakage issues. Replacing old O-rings with new ones will help reduce leaks, but it cannot prevent them from occurring again in the future if there is still excessive pressure present.
To diagnose a leak, irrigation technicians use specialized tools such as low-pressure gauges to detect and measure water pressure. Low-water flow readings may indicate that there’s something blocking the pipe causing backflow into the head or line which causes leaking. Pipes should be flushed of any built-up residue with pressurized jets regularly in order to maintain the proper functioning of the system and avoid plumbing failure down the road.
To prevent further damage, repairs should be done promptly once a leak is detected. Innovative solutions such as automating flushing cycles on timers have enabled proactive maintenance systems that lower long-term costs by avoiding unnecessary repair expenses due to undetected leaks leading into broken timers or controllers.
Broken Timers Or Controllers
After identifying the source of any leaking heads or drip lines, it is important to inspect the overall system configuration. This includes checking for anything that could be causing an issue with timing and control settings which may affect sprinkler performance. Common problems associated with timers or controllers include broken components, incorrect programming, and outdated systems.
When inspecting a timer or controller, one should look out for broken wires, corroded parts and terminals, and worn-out switches. If the unit appears to be in working order but there are still issues with operation then it is likely due to incorrect programming. In this case, it would be wise to contact a professional experienced in irrigation systems who can assess the situation better. They will also be able to advise on whether a new system would need to be installed if the existing one is too outdated for repair work.
In many cases, simply replacing broken parts such as switches or wiring can resolve operational issues with timers or controllers. It is also essential to ensure that all connections remain secure at all times and that they are free from corrosion or damage caused by environmental factors like extreme temperatures or moisture levels.
Corroded Parts
Corrosion of irrigation system parts is like a silent assassin. It can creep up on unsuspecting systems and wreak havoc with devastating results. An experienced technician knows to look for signs of corrosion when it comes to common sprinkler system problems, as it can be the root cause of several issues.
The most obvious sign of corrosion is discoloration or rusting metal components in the piping or valves. This discoloration generally occurs due to oxidation caused by constant exposure to water and other elements in the environment. If left unchecked, this could lead to rupture causing flooding or leaks that require costly repairs. In addition, corroded parts may not function properly leading to insufficient watering throughout your landscape, resulting in less than optimal growth and health of plants and lawns.
If caught early enough, corrosion damage can often be repaired by replacing worn-out parts with new ones made from more resilient materials such as brass and stainless steel. However, if neglected for long periods of time then a complete replacement becomes necessary which will considerably increase repair costs. To avoid these problems regular maintenance should be performed on all components including checking for any visible signs of wear or decay so action can be taken before it escalates into a bigger issue.
Frozen Sprinkler Pipes
When it comes to sprinkler systems, frozen pipes can be a real ‘pain in the neck’. With temperatures dropping below freezing during winter months, these pipes are at risk of bursting or becoming completely blocked. To avoid this problem, irrigation system technicians must take preventative measures such as draining and insulating the pipes before cold weather sets in. If the damage has already been done, there are still ways to repair the situation.
The most common solution is to thaw out the pipe using hot water or an electric heating pad. This method works best if only a small area of the pipe is affected; otherwise, it may not provide enough heat for a complete thawing process. Once defrosted, wrap any exposed piping with insulation material and use thermal blankets to protect them from future frost damage. Additionally, adding extra drainage points along the length of the line will help reduce pressure buildup caused by ice formation within the pipe walls.
Switching your sprinklers over to a manual mode during cold weather seasons will decrease usage and therefore also minimize potential problems associated with frozen pipes. By following these simple steps you can ensure that your system runs efficiently throughout all four seasons without fear of experiencing costly damages due to frozen lines.
Electrical Issues
Electrical issues are a common problem with sprinkler systems. An irrigation system technician must have the knowledge and experience to diagnose these problems. Voltage should be checked in all circuits, including mainline voltage and low-voltage wiring for controllers and valves.
It is important to ensure that any electrical connections are secure and not corroded or loose. The controller settings must also be programmed correctly so that zones activate as desired for optimal water coverage. Poorly maintained wiring can lead to shorts or complete failure of one or more components, resulting in an inefficient watering cycle.
Furthermore, incorrect wiring configurations may cause some sections of the sprinkler system to remain inactive due to lack of power supply. Transitioning into the subsequent section on poor connections: Connections between components may become faulty over time if they are exposed to moisture or harsh weather conditions.
Poor Connections
The complex network of irrigation pipes, connectors, and wires can easily become corroded or otherwise damaged over time. Much like a faulty electrical circuit in your home, the poor connections between components of an automatic sprinkler system can cause a variety of problems that limit its ability to do its job effectively. To have an efficient system, it is essential to keep up with regular maintenance and check for any potential problem areas.
A technician must carefully inspect each connection point along the system’s piping and wiring pathway to determine if there are any signs of wear or deterioration. Even slight damage such as fraying insulation on the wire casings, corrosion on metal pipe threads, or loose clamp seals, can disrupt the flow of water throughout the entire system. In some cases, small bits of debris may also be lodged inside certain parts causing a blockage which could lead to inconsistent watering patterns.
Locating these issues requires keen attention to detail as well as specialized tools and equipment to properly identify them. Using a combination of visual inspection methods combined with pressure testing devices helps technicians accurately diagnose any weak points in the connection pathways so they can be replaced before further damage occurs.
As long as all elements are regularly monitored and kept secure, users should experience years of dependable service from their automated sprinkler systems.
Animal Damage
Animals can cause a variety of issues for an irrigation system. Rodents, such as mice and rats, will often build nests in the sprinkler heads or wiring leading to malfunction and broken parts. Birds may also be attracted to the water source itself, causing problems with both the mechanical components and clogging from debris.
Additionally, insects like fire ants are known to create mounds near sprinklers which can damage them if not properly maintained. These animals have the potential to significantly degrade any irrigation system’s performance.
A technician must take into consideration these animal-related issues when diagnosing and repairing systems. The most common solution is preventive maintenance, including regular cleaning of all areas where animals could potentially access the system or its parts.
Regular inspections should also occur in order to catch any signs of activity early on before it leads to significant damage. Finally, technicians should consider installing protective barriers around sprinkler heads that would prevent small rodents from entering while still allowing water to flow through the head itself.
Read also:
Did you find this post useful? Would you like to get back to it later? Save THIS PIN below to your gardening or vegetable board on Pinterest! 🙂
My dad has been complaining that his sprinklers suddenly don’t have a lot of water pressure and aren’t working very well. Thanks for explaining that this can be a pretty good indicator that his sprinklers have a pipe problem. I’ll have to let him know this so that he can look into professionals he can call to come and fix them so his sprinklers can go back to working well again.